
Thanks for stopping by Southeast4x4trails.com! If you are looking for a detailed guide on how to install a GMRS mobile radio or a mobile Ham radio in your Jeep or off-road vehicle you have come to the right place. Keep reading for more details about this 5-part series on my off road radio install project.
If you have found your way here via Google, this site is about the Jeep, 4×4, and off-road community in the Southeast US. Check out the home page for an interactive Google map of trails, off-road parks, forest service roads, points of interest and more in the GA, TN, NC, and SC areas. The Journal has other articles similar to this one on topics of interest such as “how-to” guides, trails and places to visit, and local history. The Resources page has many links to mapping, GIS, USFS forest areas, and technical info.
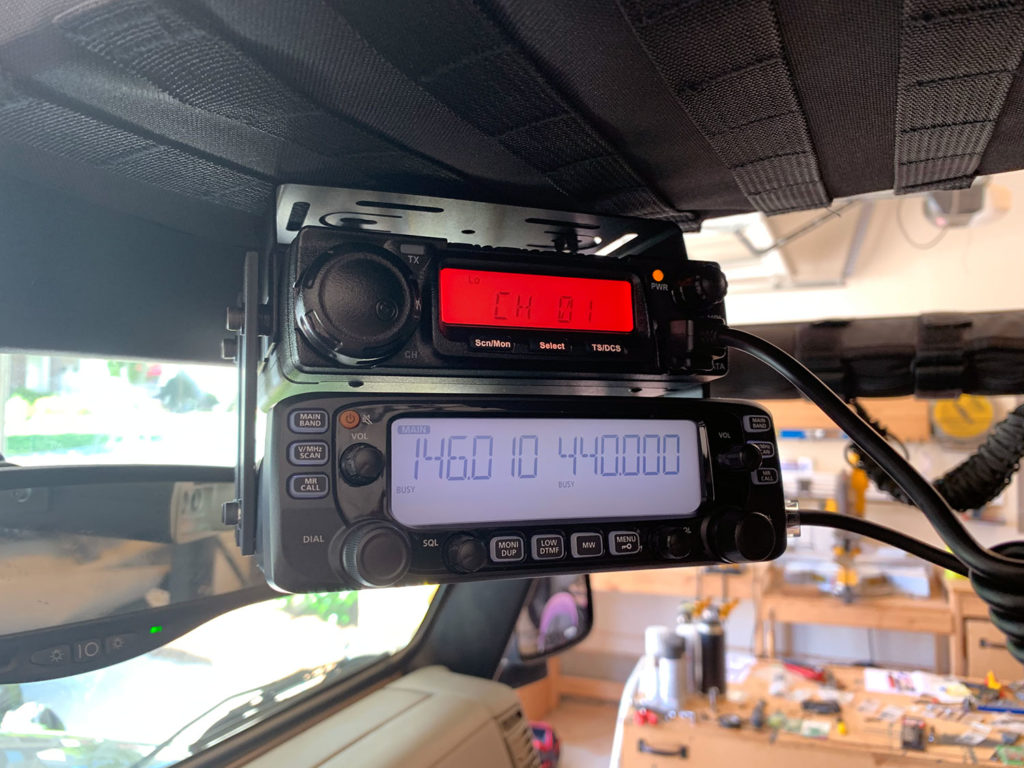
This is the second in a series of 5 posts that detail the install of a Midland MXT400 MicroMobile GRMS radio and an Icom IC-2730A ham radio in my Jeep Wrangler TJ. You can adapt this information to any vehicle, it doesn’t have to be a Jeep TJ or even a Jeep!
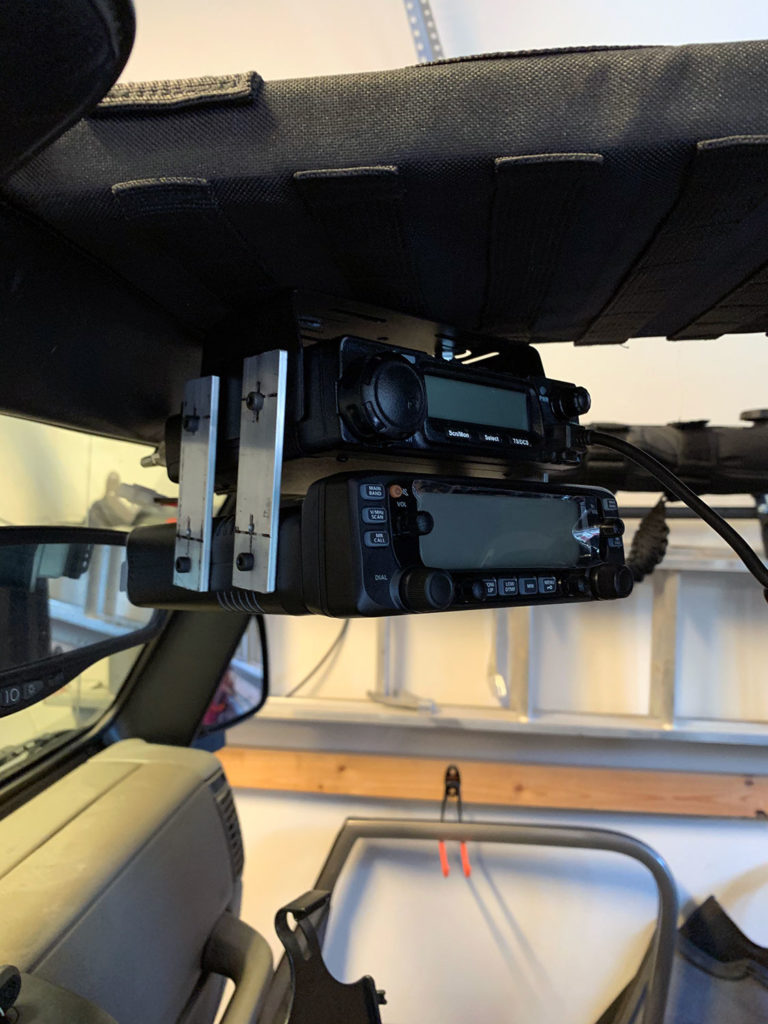
This post will cover how I mounted both radios using a Smittybilt G.E.A.R overhead console and a set of custom made mounting brackets.
Part 1 includes a complete list of all the radio gear, tools, parts, and hardware that I used. The gear and parts that are used in this post are below as well.
If you want to jump directly to the install info just click one of the links below :
- Part 1 – Project Details, Gear, Parts and Tools
- Part 2 – Mounting the Midland MXT400 GMRS Radio and Icom IC-2730A Ham Radio
- Part 3 – Mounting the Radio Antennas
- Part 4 – Power, Wiring and Fuse Block Installation
- Part 5 – Radio Power Wiring and Antenna Coaxial Cable Installation
Before we get started I’d like to ask you for a favor. If you find this post useful please consider supporting this site by purchasing any of the items items listed in the post through the links provided. The links to Amazon are affiliate links, and the small commission that I may earn keeps this site running so I can continue to provide helpful information.
Gear and Parts List
The following gear and parts were used in this post:
Radio Gear
■ Smittybilt G.E.A.R Overhead Console for Jeep TJ (5665001) – Extreme Terrain – Quadratec
■ Midland MXT400 MicroMobile Two-Way GRMS Radio – Amazon
■ Icom IC-2730A VHF/UHF Dual Band Transceiver (Ham Radio) – Amazon
■ Icom MBA-4 Controller Mounting Bracket – (For Icom IC-2730A) – Ham Radio Outlet or GigaParts.com
Hardware
■ Everbilt #10-24 1.75″ Phillips Round Head Machine Screws (Qty: 2) – Home Depot
■ Everbilt #10-24 Flat Machine Screw Nuts (Qty: 6) – Home Depot
■ Everbilt #10 Inner Diameter (ID) x 5/16″ Outer Diameter (OD) x 1″ Aluminum Spacers (Qty: 2) – Home Depot
■ Everbilt #10-24 Nylon Lock Nuts (Qty: 2) – Home Depot
■ Everbilt Flat Aluminum Bar – 1″ (W) x 36″ (L) x 1/8″ (D) (Qty: 1) – Home Depot
■ Everbilt M4-0.7 x 15MM Socket Cap Screws (Qty: 4) – Home Depot
■ Everbilt M4-0.7 x 12MM Socket Cap Screws (Qty: 4) – Home Depot
■ Everbilt #8 Flat Nylon Washers (Qty: 24) – Home Depot
Paint & Primer:
■ Rust-Oleum Clean Metal Flat White Primer (7780830) – Amazon
■ Rust-Oleum Flat Black Protective Enamel (7776830) – Amazon
■ Rust-Oleum Universal Dead Flat Clear Durable Topcoat (342482) – Amazon
Tools
■ 7/32″ Milwaukee Cobalt Red Helix Hard Metal Drill Bit (48-89-2311) – Amazon
■ 5/32″ Milwaukee Cobalt Red Helix Hard Metal Drill Bit (48-89-4607) – Amazon
■ Electronic Digital Precision Caliper – Amazon (Optional)
■ Ryobi P340 One+ 18V Rotary Tool – Amazon (Optional)
■ Dremel MM485 Multi-Max Carbide Flush Cut Blade – Amazon (For Ryobi P340 Rotary Tool)
■ Ryobi P5231 One+ 18V Cordless Jigsaw – Amazon (Optional)
■ Bosch T121AF3 Jigsaw Blade for Metal – Amazon (For Ryobi P5321 Jigsaw)
■ Kreg KMA2900 Multi-Mark Tool – Amazon (Optional)
■ Harbor Freight Central Machinery 8″ 5-Speed Drill Press – Harbor Freight (Optional)
Radio System Guide & Wiring Diagram
The graphic below shows the entire radio system and how each component is connected and wired. All parts that are in front of the ‘Jeep Firewall’ box are mounted in the engine compartment. Click to download the diagram in PDF format.

Smittybilt G.E.A.R Overhead Console
The idea to base the radio mounts off of an overhead console came from the radio setup I had back in my first TJ, a 2000 Sport. Back then Tuffy Security Products made an overhead console that had 2 swing away doors that could be used to mount a CB. I also mounted my Icom IC-2800H ham radio on that overhead console and always liked the setup and where the radio display/controller was accessible but out of the way.
I came across the Smittybilt G.E.A.R overhead console while browsing parts one day, and figured it could be used to mount both the Midland MXT400 GMRS radio and the Icom IC-2730A ham radio I was planning to install. The console cover has an integrated MOLLE system (modular, lightweight load-carrying equipment) webbing that allows you to attach and configure MOLLE gear such as MOLLE pouches or attachments in a modular (however you want to) fashion.
If this term sounds somewhat familiar you have probably seen in the military as that is where it originated and was developed. Basically, you can place the attachments in different configurations to suit your storage needs. The additional storage space is a nice plus in a Jeep where storage can already be tight.
The construction of the Smittybilt overhead console is very strong and rigid. It consists of an overhead “main frame” which is solid metal and a 600 Denier polyester/nylon cover that wraps around the main frame. The MOLLE straps/webbing are on the cover. It also comes with 6 different MOLLE style pouches and the necessary mounting hardware. The rear of the overhead console main frame attaches to the center of the Jeep’s roll bar using metal clamp sleeves. The front of the main frame attaches to the windshield and footman loop with metal brackets. See the installation instructions for more details on all the parts and components.
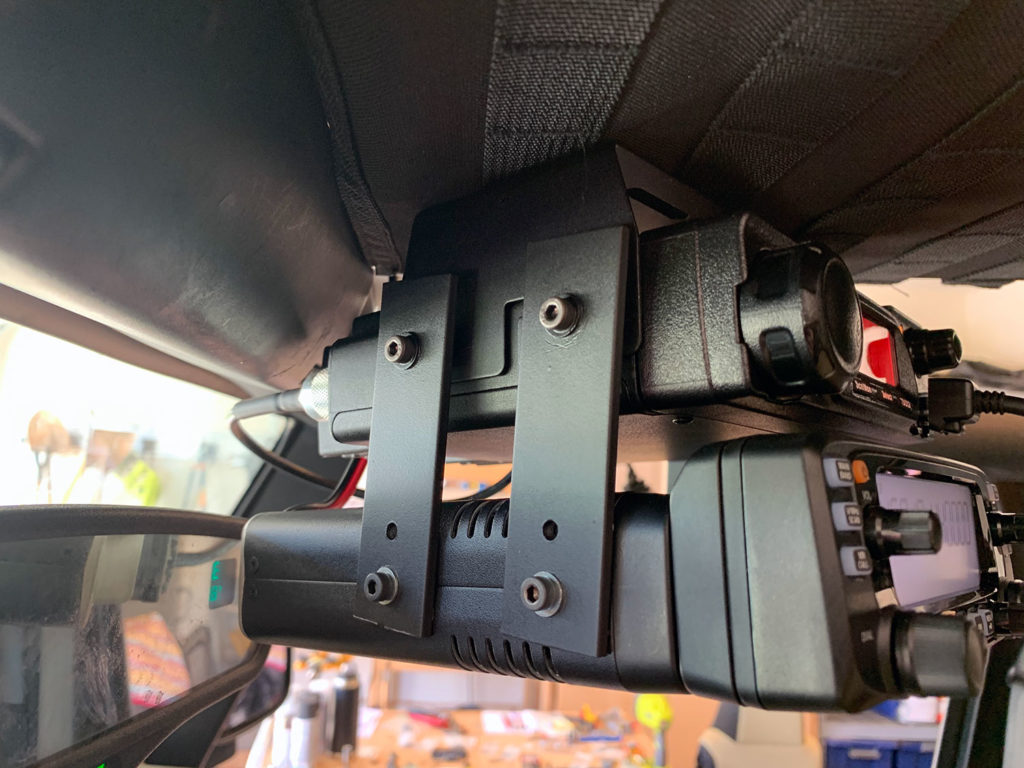
To start, install the overhead main frame but do not cover it with the nylon MOLLE wrapper. You will need to attach the Midland MXT400 mounting bracket first.
1. Mark and Drill Holes for the Midland MXT400 Mounting Bracket
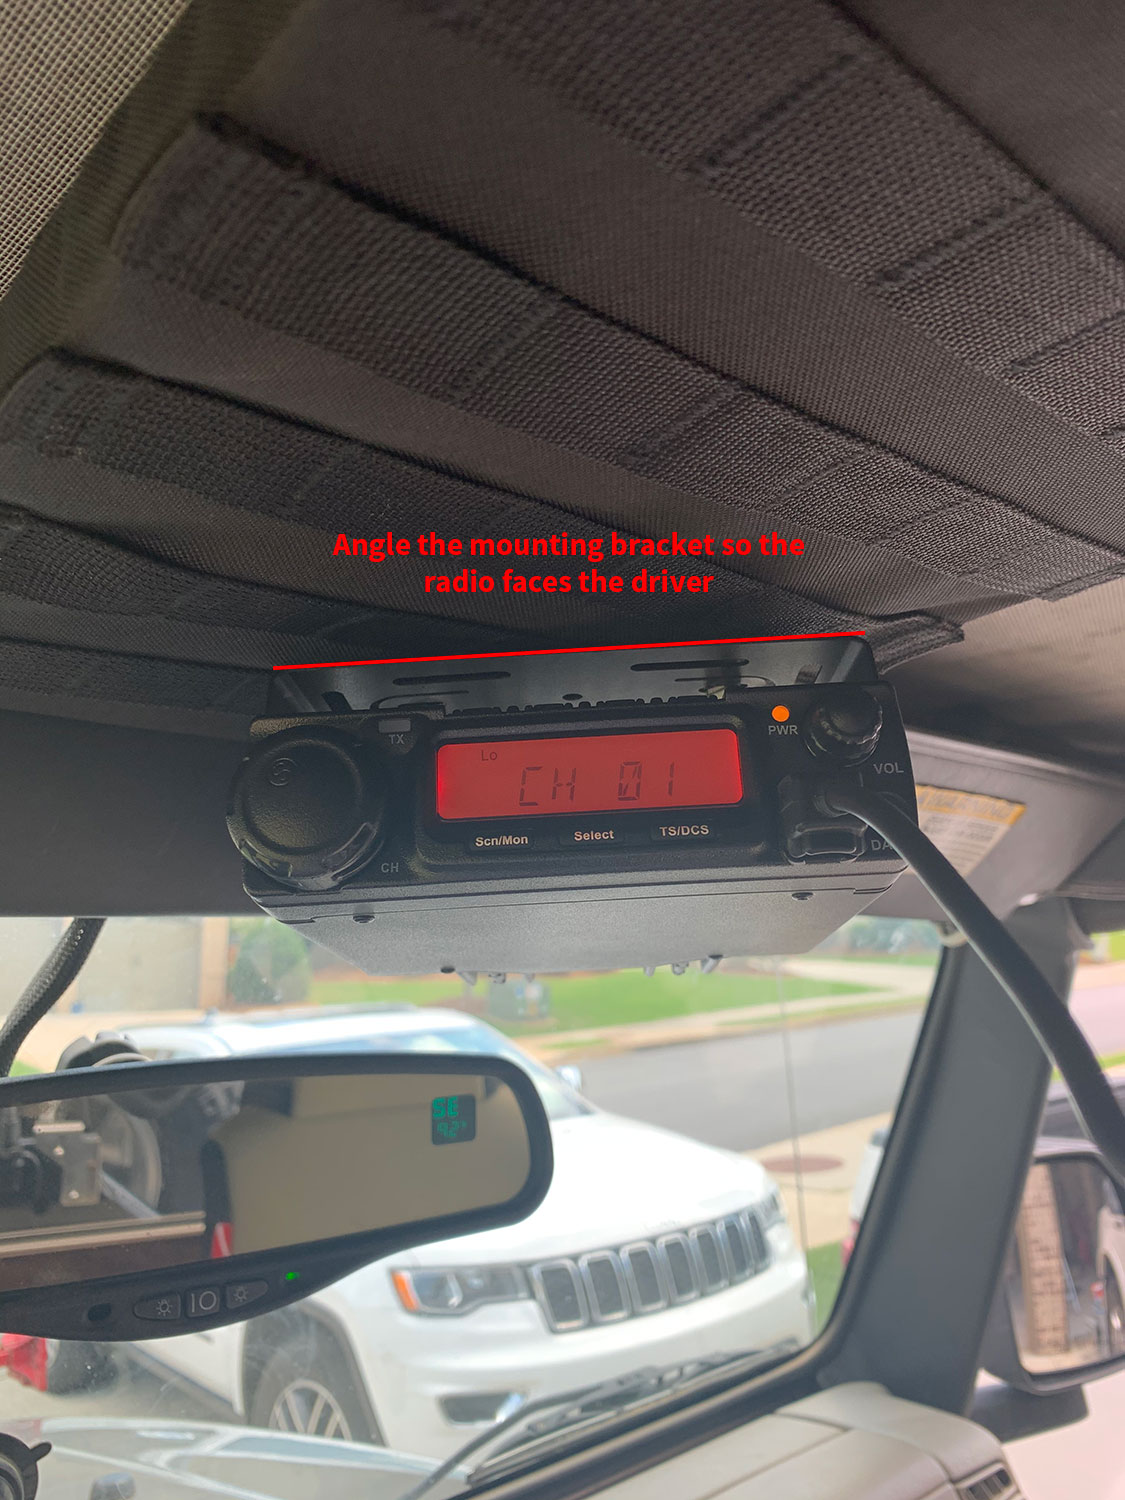
To determine the position of the holes for the mounting bracket align the bracket on the overhead console frame so that the radio face will be angled towards the driver. This will set the angle of the radio correctly so that it faces the driver’s seat.
Hold the bracket against the overhead console frame with one hand and mark the position of the two holes shown on the bracket image below. Use a silver or other (similar) color Sharpie/pen to make the marks so they are easy to see against the black coating of the overhead console frame.
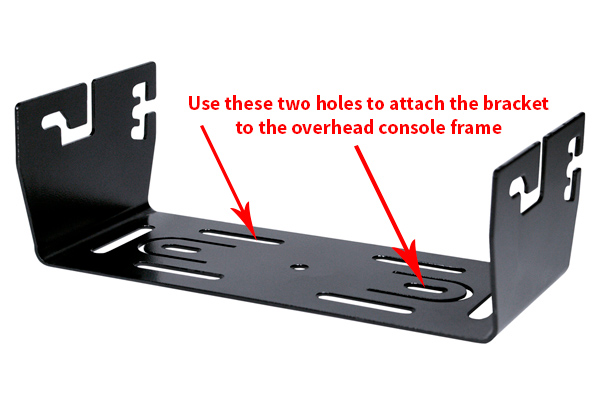
Next, use a 7/32″ drill bit that is suitable for metal to drill the first hole such as a Milwaukee Cobalt Red Helix Hard Metal bit. Using the Midland MXT400 mounting bracket, check the alignment of the hole by holding the bracket up and aligning the bracket with the hole. If you need to re-mark or adjust the position of the second hole, make a new mark while you are still holding the mounting bracket in place.
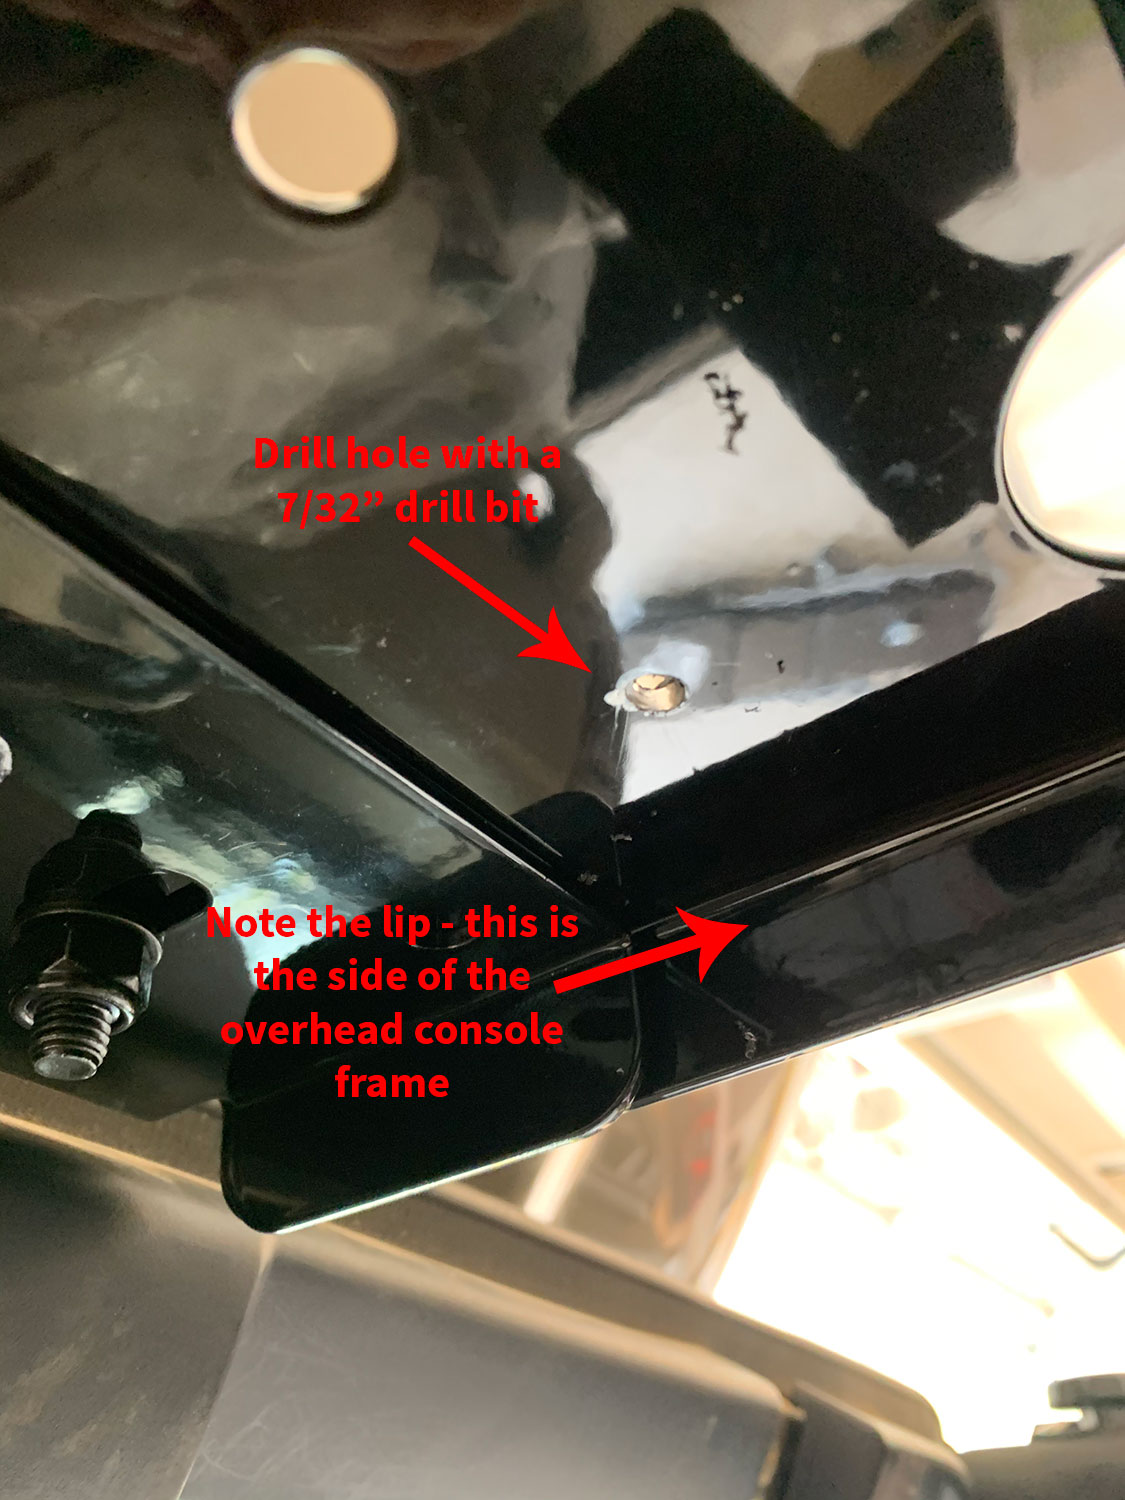
Note the lip on the side of the overhead console frame. This lip points down, which means that there is a gap between the top of the overhead console main frame and where the cover and MOLLE pouches actually sit when the cover is attached.
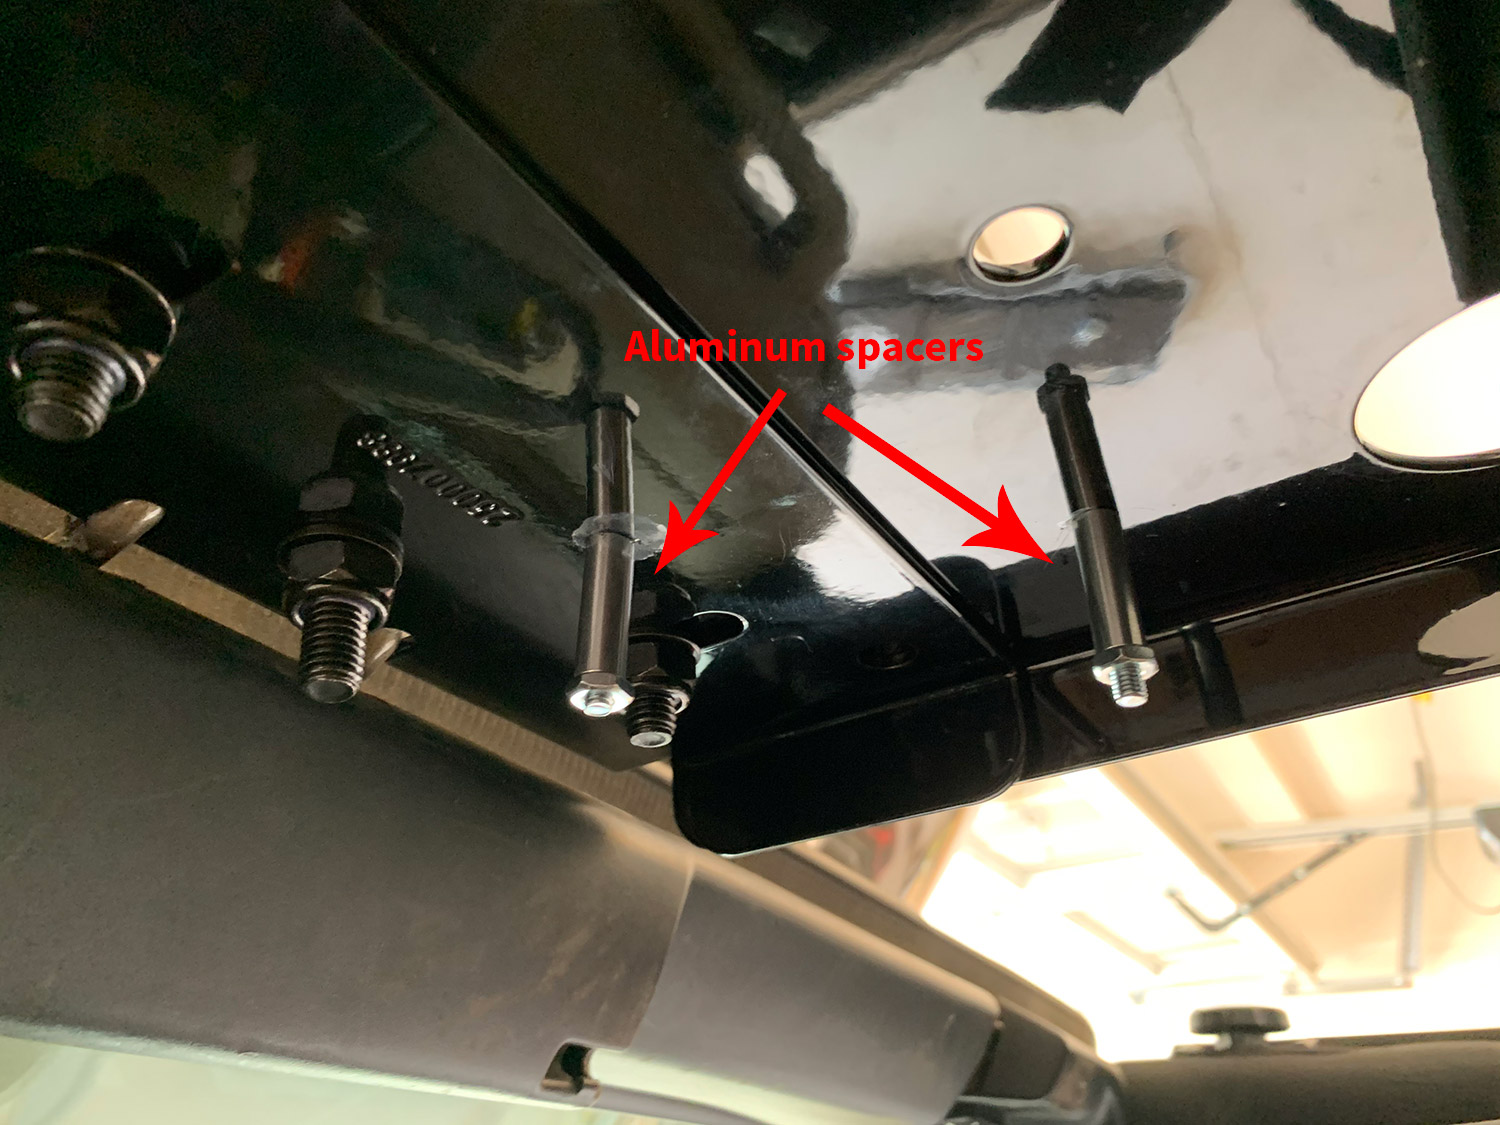
You can use aluminum spacers between the top of the overhead console frame and the Midland MXT400 mounting bracket to ensure a rigid installation of the bracket as shown in the steps below. This is important due to the constant vibration when driving off road – and so it isn’t generally annoying and bouncing around while you are on the trail.
2. Insert the Screws and Spacers for the Midland MXT400 Mounting Bracket
After you drill both holes, insert two #10-24 1.75″ Phillips round head machine screws from the top of the overhead console frame. Secure the screws in place by using 2 #10-24 flat machine screw nuts (on each screw – 4 total) as shown in the photo below.
Tighten the first nut against the bottom of the overhead console frame, then tighten the second nut against the first. Once both nuts are tightened, check to make sure the screw is secured in place tightly and there is no play or wobble. Again, as mentioned above this is important due to the constant vibration when driving off-road. You don’t want the radios shaking around as it can damage them as well.
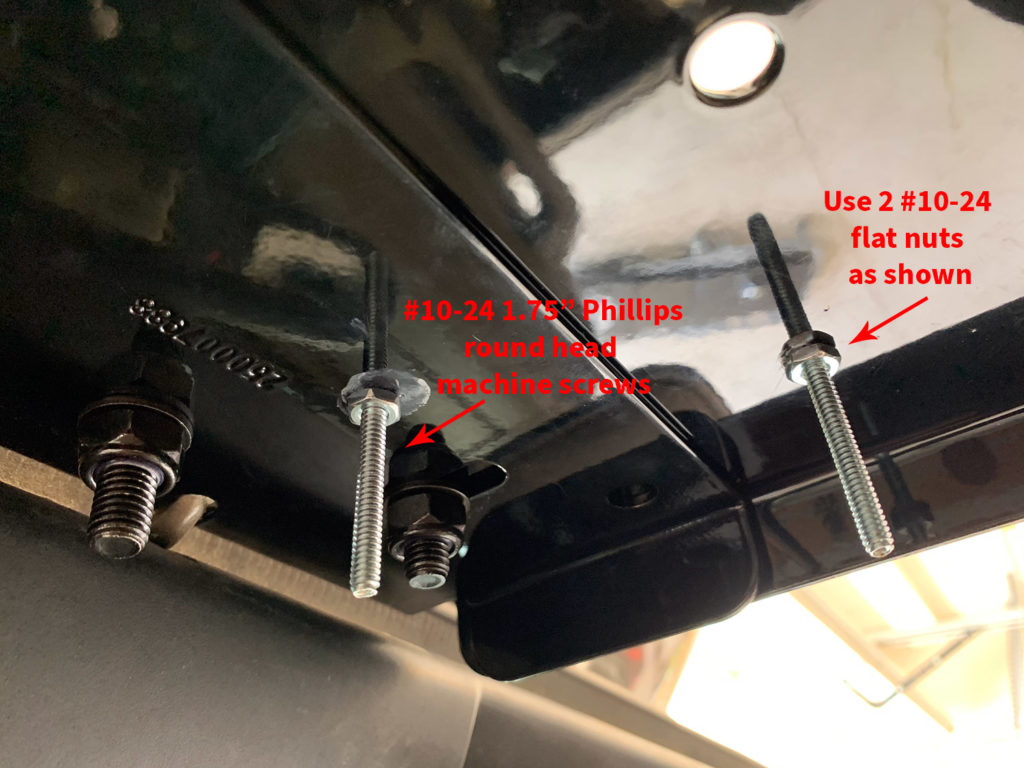
Next, slide the two #10 Inner Diameter (ID) x 5/16″ Outer Diameter (OD) x 1″ long aluminum spacers over the two screws. Secure the spacers in place with two more #10-24 flat machine screw nuts.
3. Attach the Midland MXT400 Mounting Bracket
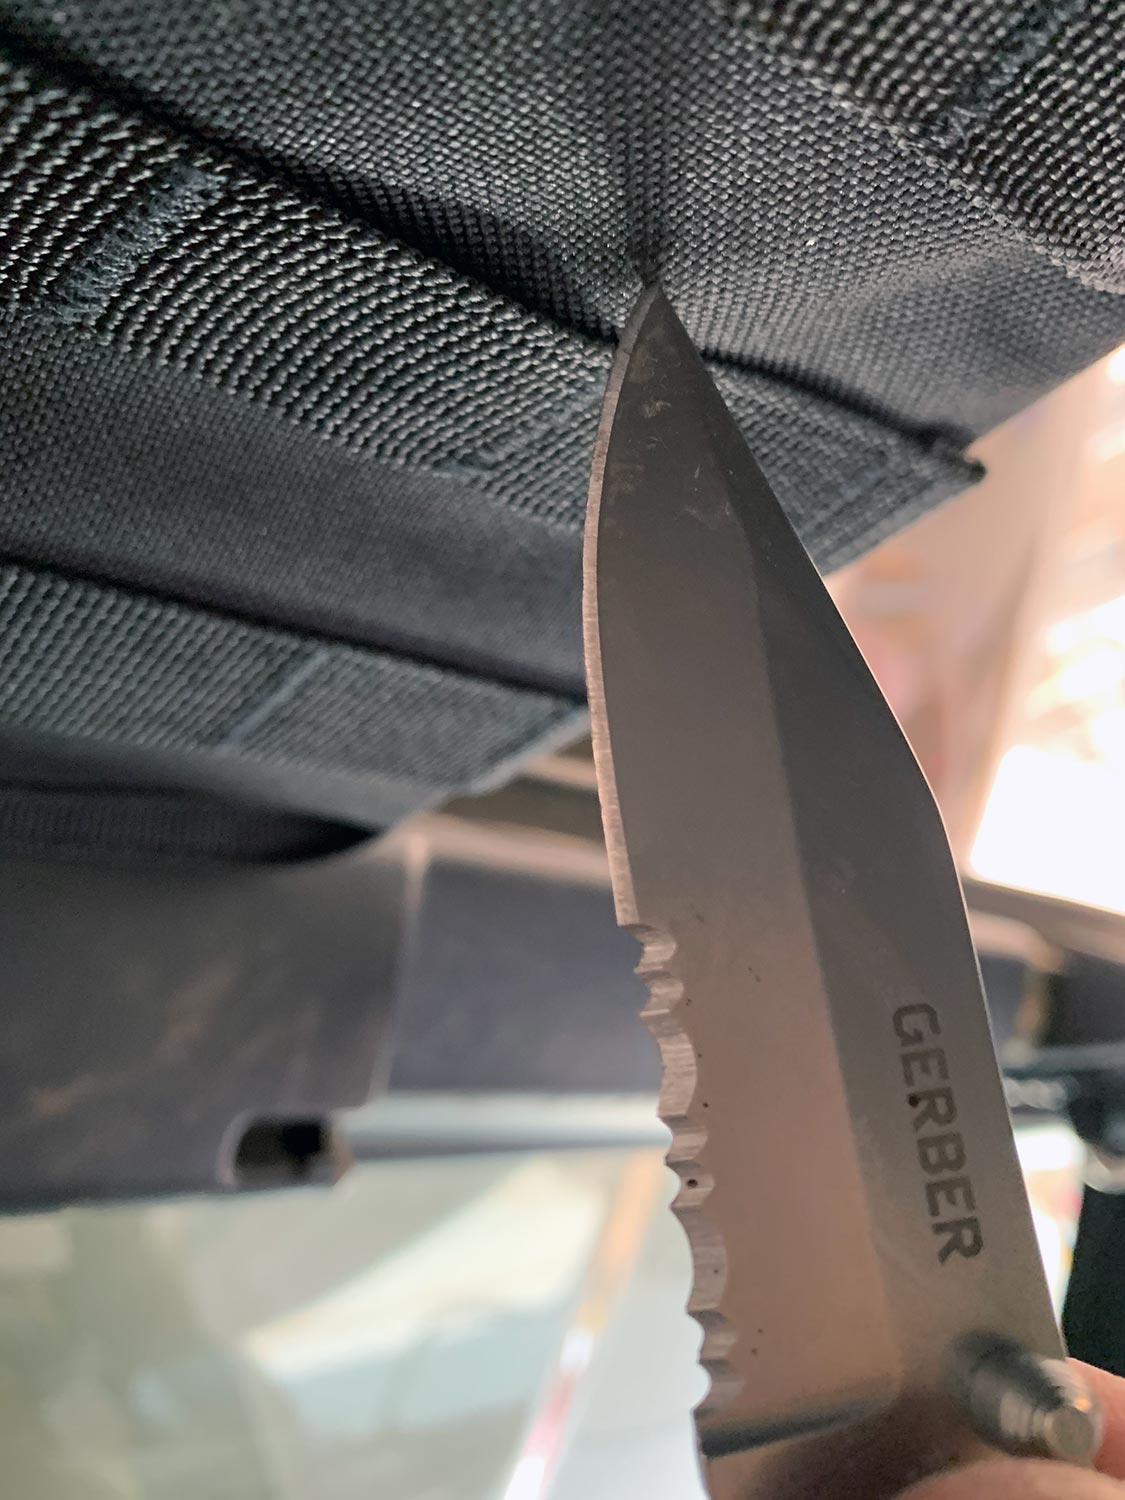
Now that the aluminum spacers are installed, place the nylon gear cover over the main frame and make sure it is tight using the velcro straps that attach on top of the overhead console main frame. You should be able to see the ends of each of the screws as shown below. Use a knife or other sharp object to make two small holes in the gear cover where the screws are located – just large enough for the end of the screw to pass through the cover.
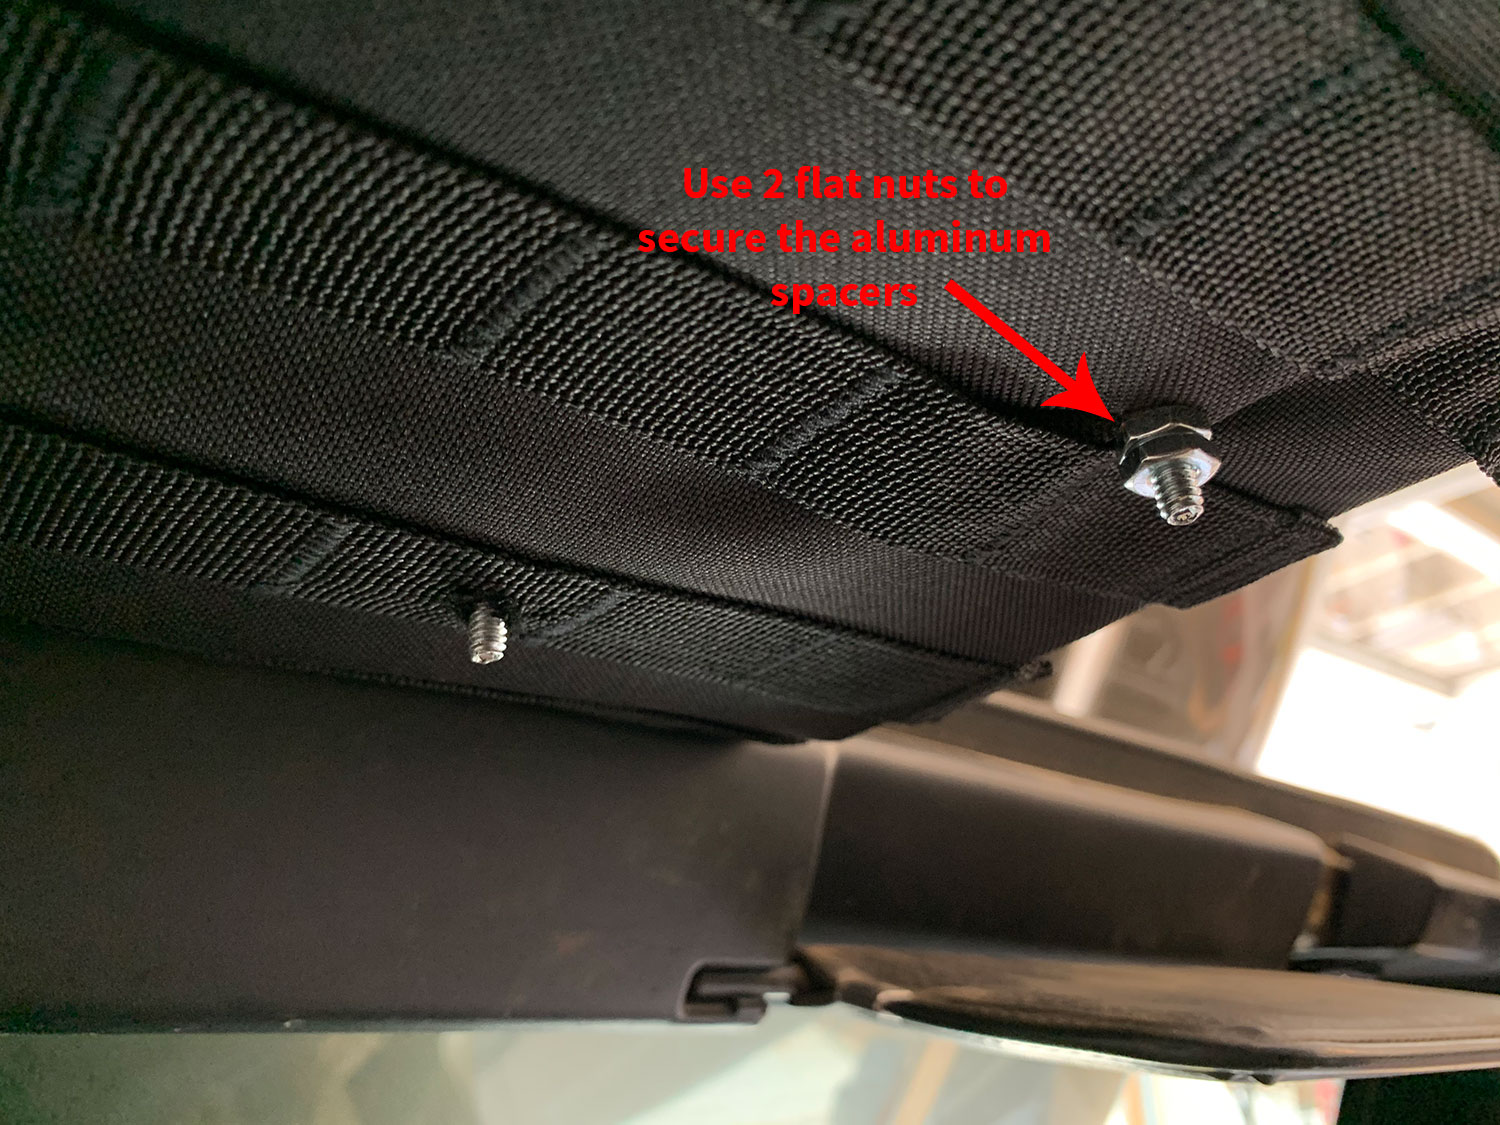
Loosen the nylon gear cover and the two flat nuts that are holding the aluminum spacers in place. Slip the ends of both screws through the two holes you just made, then replace the flat nuts onto the screws from the outside of the gear cover. This will secure the aluminum spacers in place.
It’s easier if you just loosen the gear cover enough to slip the screws through the holes instead of fully removing the cover then trying to re-attach it with the screws in place.
Use two #10-24 flat machine screw nuts per screw/spacer to secure the screws and spacers in place similar to the mounting screws in step 2.
You can now install the Midland MXT400 mounting bracket. Position it in place using the screw positions on the bracket as shown in step 1. Use two #10-24 nylon lock nuts to attach the bracket to the mounting screws. These nuts are vibration-resistant – they will help hold the bracket nice and tight against the mounting screws/spacers.
4. Test Fit the Midland MXT400
Test fit the Midland MXT400 in the mounting bracket and make sure everything is nice, tight and secure. There are 3 different screw positions on the rear of the mounting bracket that allow you to adjust the radio body in an up, neutral or down position. Try each and determine which position you like best.

5. Measure for the Icom IC-2730A Mounting Brackets
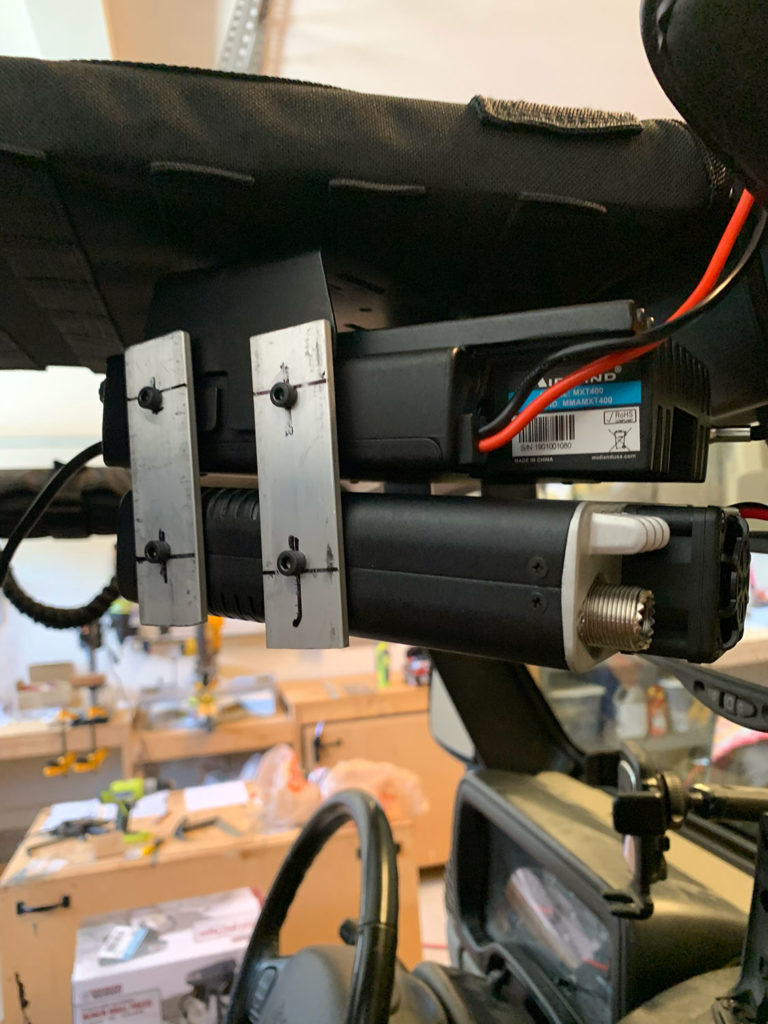
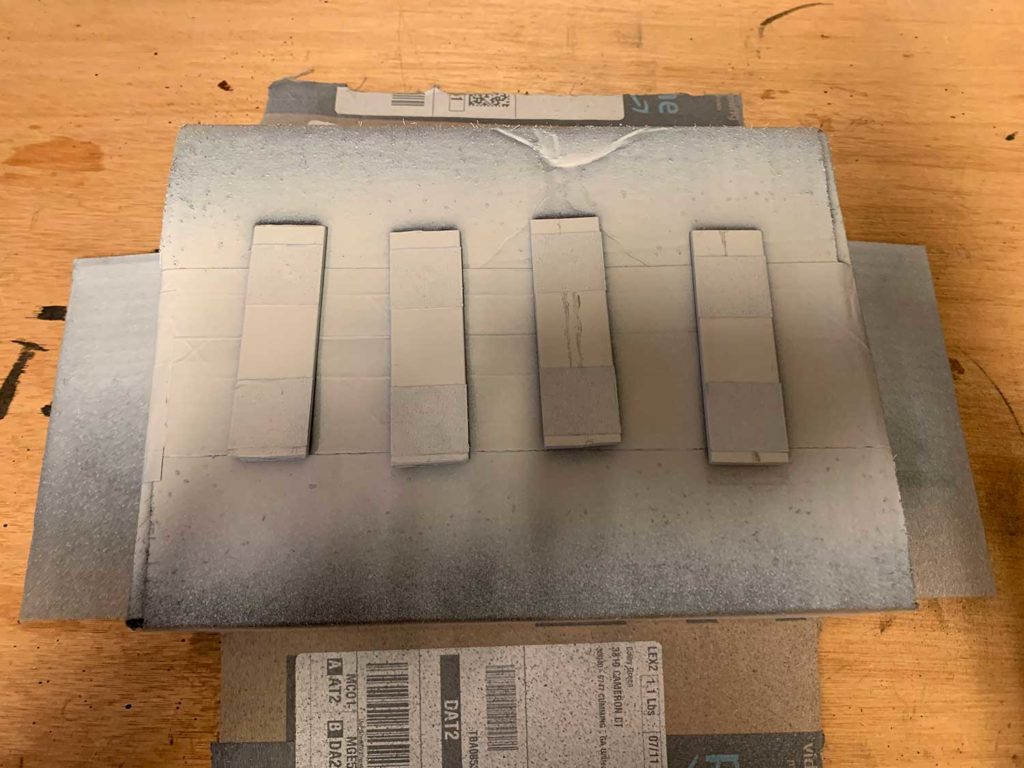
With the MXT400 in place, it’s time to make some custom mounting brackets for the Icom IC-2730A. As you can see in the photos in part 1 of the series, these custom brackets allow the Icom IC-2730A to sit directly under the Midland MXT400.
Before we jump into the details of how to measure for the brackets, let’s talk about materials. The brackets for the Icom IC-2730A are made out of solid flat aluminum bar stock that you can buy at Home Depot or a similar home improvement, hardware, or metal supply store. The idea for this project was to use materials that were readily available and did not require specialty metalworking tools other than those you might already have or can buy at home improvement stores. I don’t have that many metalworking tools, so that is the reason why I went with this approach.
I first attempted to make these brackets out of 2″ flat aluminum bar stock only to find out that they were too wide when all 4 brackets are mounted, so the final versions were made out of 1″ flat aluminum bar stock. Some of the photos below show the 2″ bar stock because those are the pictures I had for a given step, but the same concepts apply with regards to how to measure and make the brackets.
The 1″ bar stock is from Home Depot – Everbilt Flat Aluminum Bar 1″ (wide) x 36″ (long) x 1/8″ (thick). 1 bar is more than enough for the brackets.
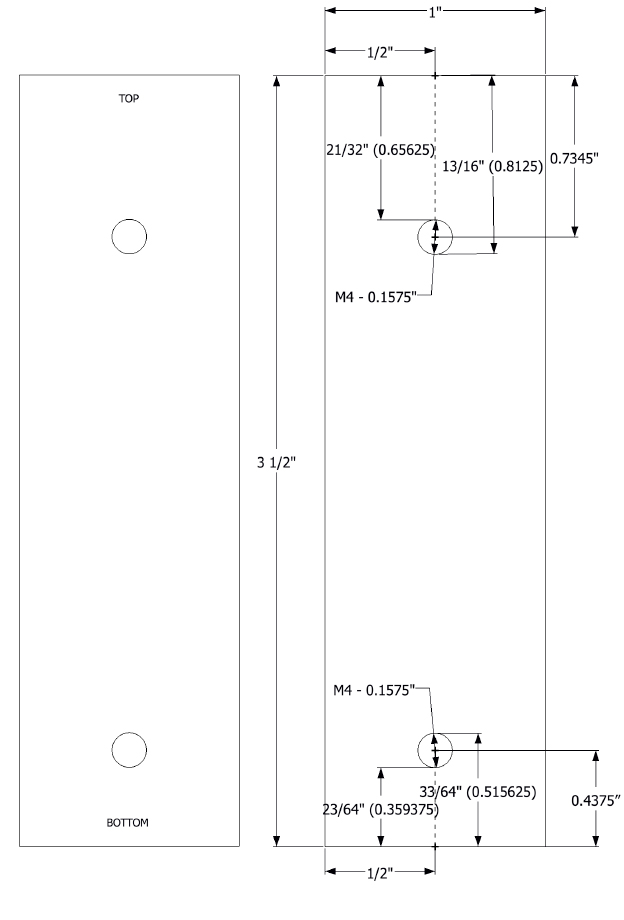
The easiest way to fabricate the brackets is to make paper templates first, then use the templates to mark and drill the holes in the brackets. To make this task a bit easier, the drawing below contains the exact measurements for the brackets that I made.
You can also download this template using the link below. I have set the PDF file to print to actual size, but I would suggest double-checking the measurements on the template after you print it and before you make any cuts. Using a pair of precision calipers will help make measuring quick and easy.
Template Download: Icom IC-2730A Mounting Bracket
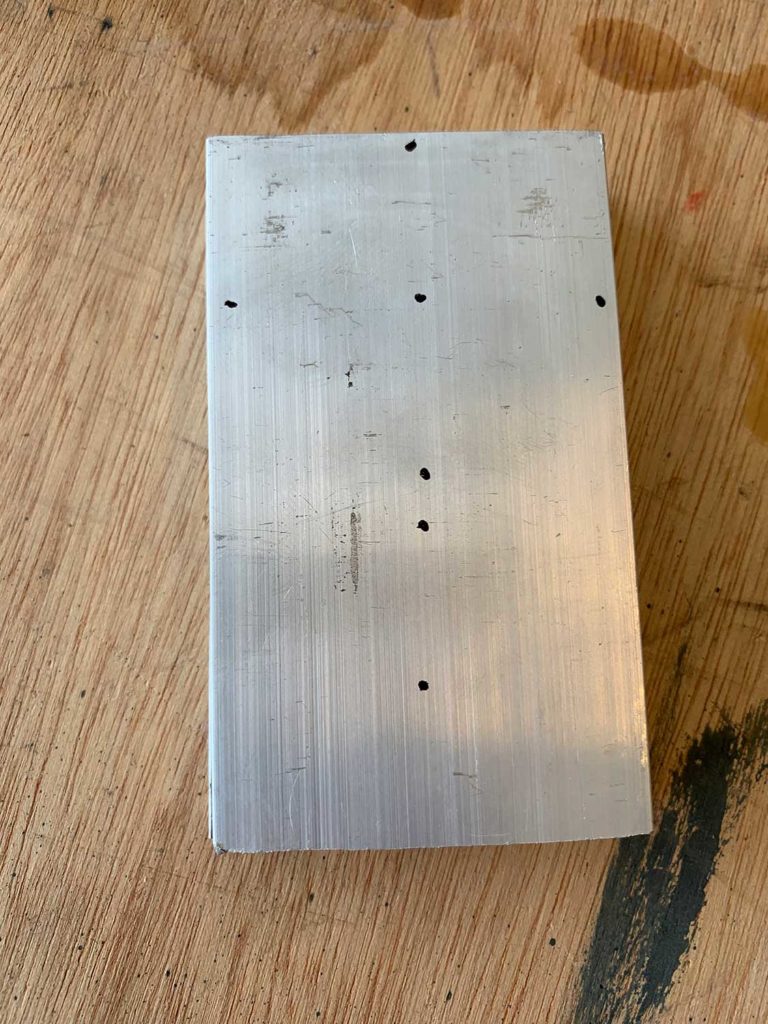
6. Mark the Overall Dimensions on the Paper Template
The overall bracket dimensions are 3.5″ long by 1″ wide. Mark these dimensions on a piece of paper and cut it out. Also, mark the center of the template at 0.5″ (vertical – half the width of the template) on the top and bottom sides. If you want more space between the Midland MXT400 and Icom IC-2730A make the length of the bracket longer. If you use my bracket dimensions the two radios will be about 1/4″ apart at the front of the radio bodies where the displays are.
Ignore the width of the template in the photo below. It was for one of the 2″ wide brackets that I made.
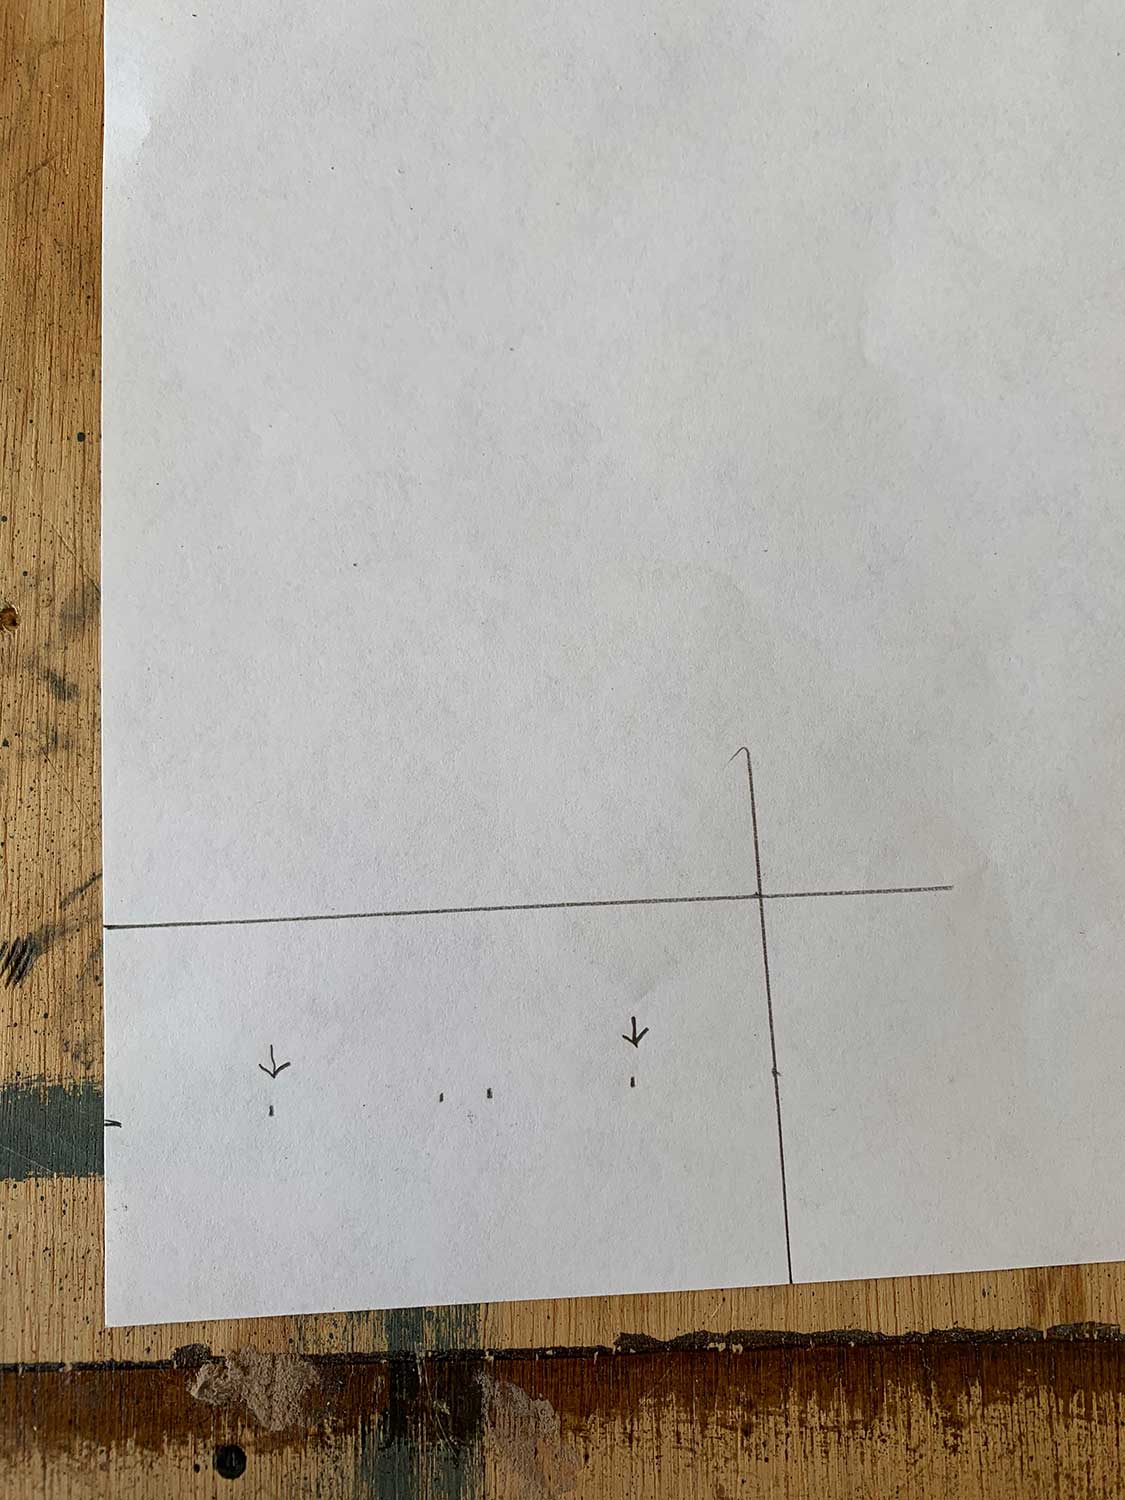
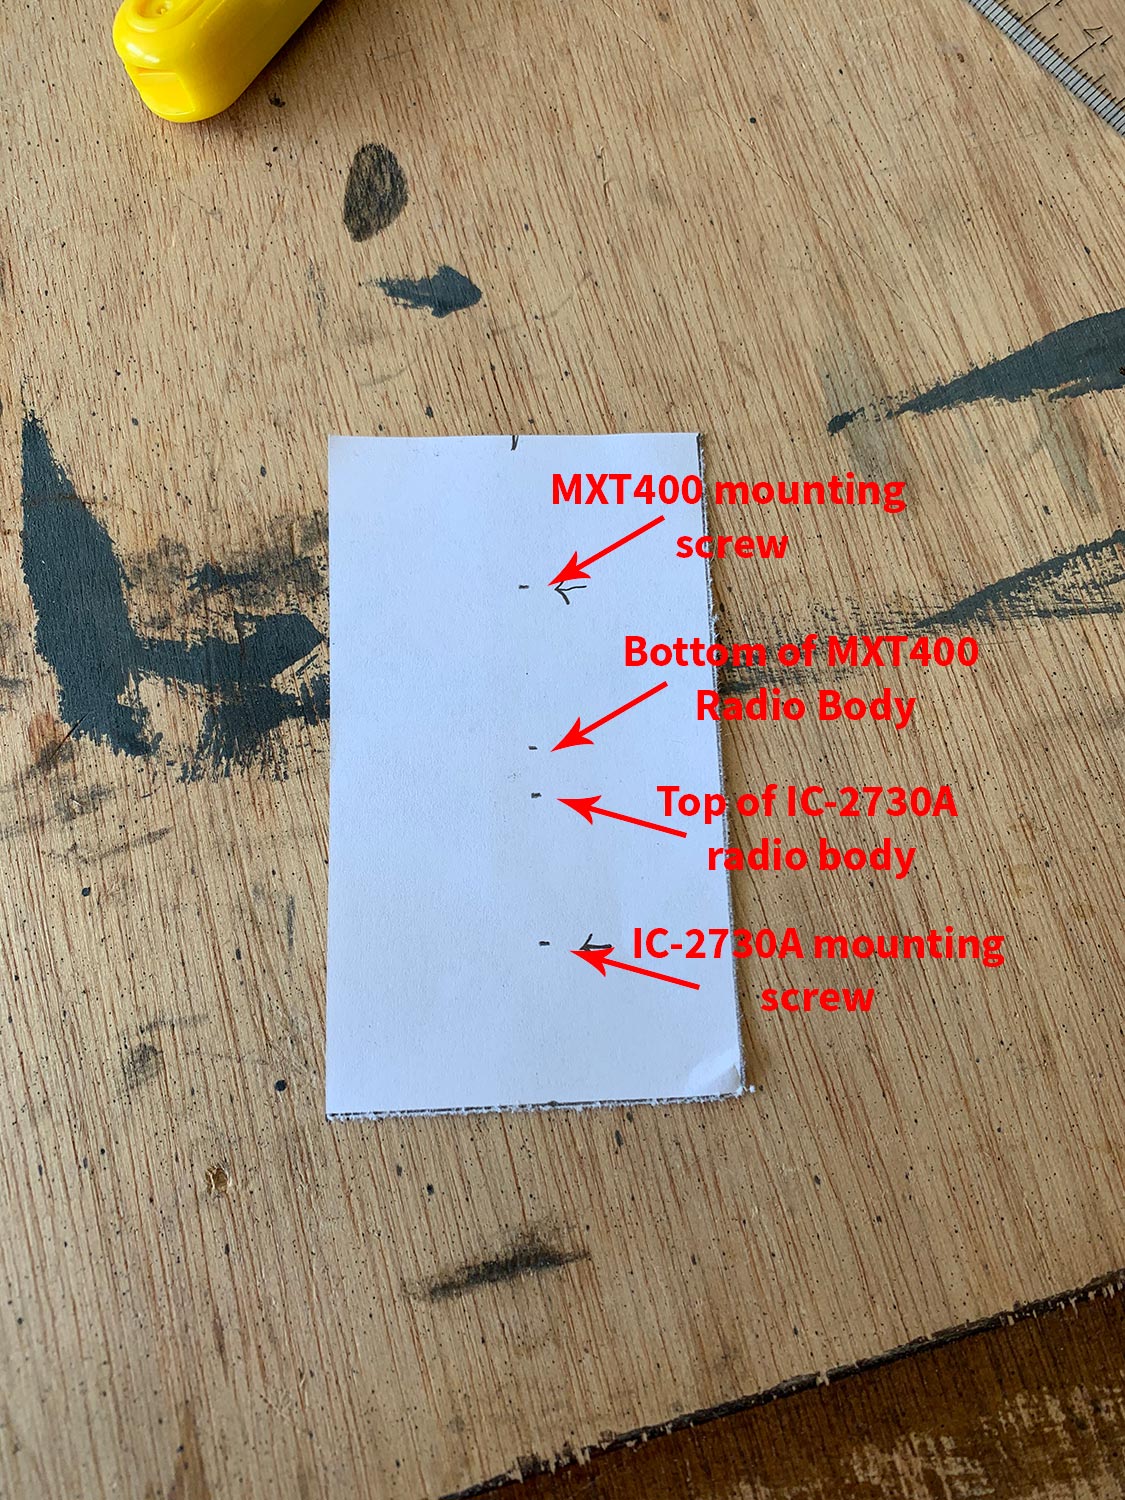
7. Mark the Midland MXT400 and Icom IC-2730A Measurements
Next, align the template with the top of the Midland MTX400 radio body and mark the position of the mounting screw/hole. It should be about 0.7340″ (~3/4″) from the top of the radio body/paper template.
Measure from the center of the mounting screw/hole to the bottom of the Midland MXT400 radio body and mark that dimension on the paper template.
Decide how much space you want to have between the bottom of the Midland MXT400 radio body and the top of the Icom IC-2730A radio body (1/4″, 1/2″, etc). Measure that distance from the mark you made for the bottom of the Midland MXT400 radio body and mark it on the template. This mark will align to the top of the Icom IC-2730A radio body.
Now measure from the top of the Icom IC-2730A radio body to the center of the mounting screw/hole and mark it on the paper template. The distance from the center of the mounting hole to the bottom of the bracket should be 0.4375″ to the bottom of the bracket. Also, mark the bottom of the Icom IC-2730A radio body on the template as well.
Once all of your measurements are marked on the paper template, it should look pretty close to the photo below.
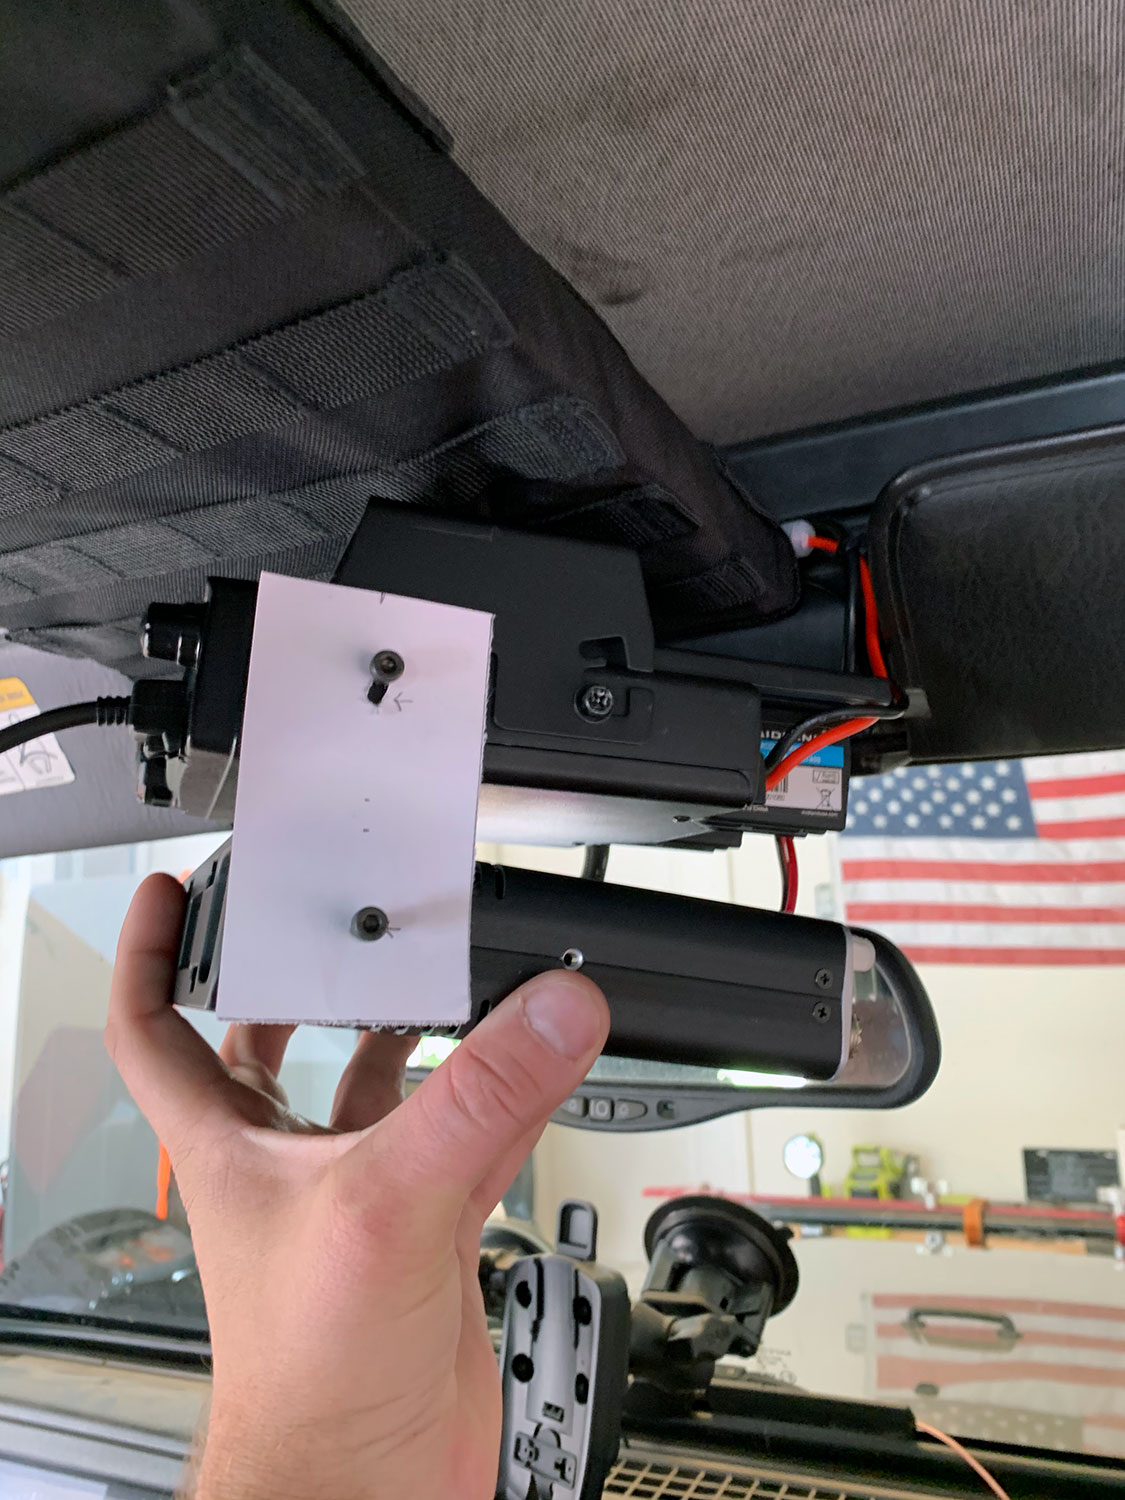
8. Test Fit the Paper Template
Both radios use M4-0.7 socket cap screws in the mounting holes. Use one of those screws to make holes in the paper template where the mounting screws are located. Just put something semi-rigid under the paper template and gently push the M4 screw through the paper to make a clean hole.
Next, carefully slide the paper template over one of the mounting screws on the Midland MXT400. Hold the Icom IC-2730A radio body in one hand and align the mounting screw hole with the bottom hole in the paper template and check for proper fit and the desired space between the two radio bodies. This is much easier to do with 2 people, but you can manage to do it with one person as I did.
9. Transfer Paper Template Measurements to the Aluminum Brackets
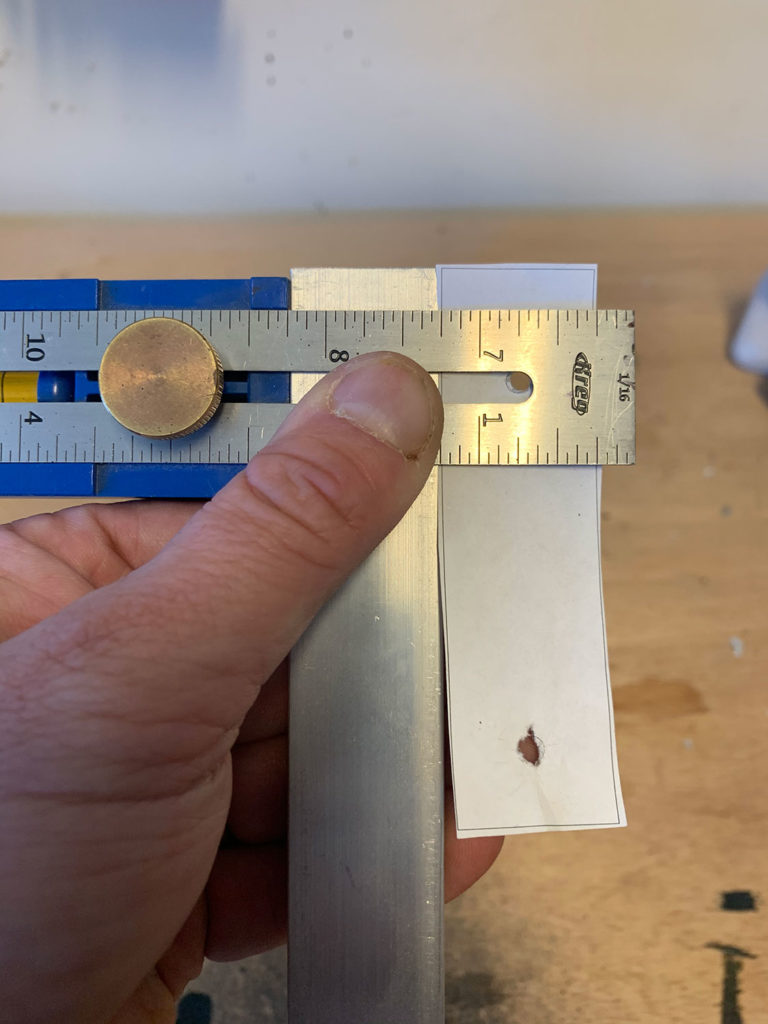
Make a mark at 3.5″ on the piece of Everbilt Flat Aluminum Bar 1″ bar stock and cut the first bracket. Since I don’t have many metal-specific cutting tools I tried several different tools to cut the brackets. I found that the best results came from using either a rotary cutting tool such as the Ryobi P340 with a Dremel MM485 Multi-Max carbide flush cut blade or a jigsaw such as the Ryobi P5231 with a Bosch T121AF3 metal blade.
Make a mark at 0.5″ (vertical – half the width of the bar stock) on the top and bottom of the bracket. Use your paper template and a straightedge to transfer the measurement marks from the paper template to the metal bracket. My favorite straightedge tool for tasks such as this is the very handy Kreg KMA2900 Multi-Mark tool.
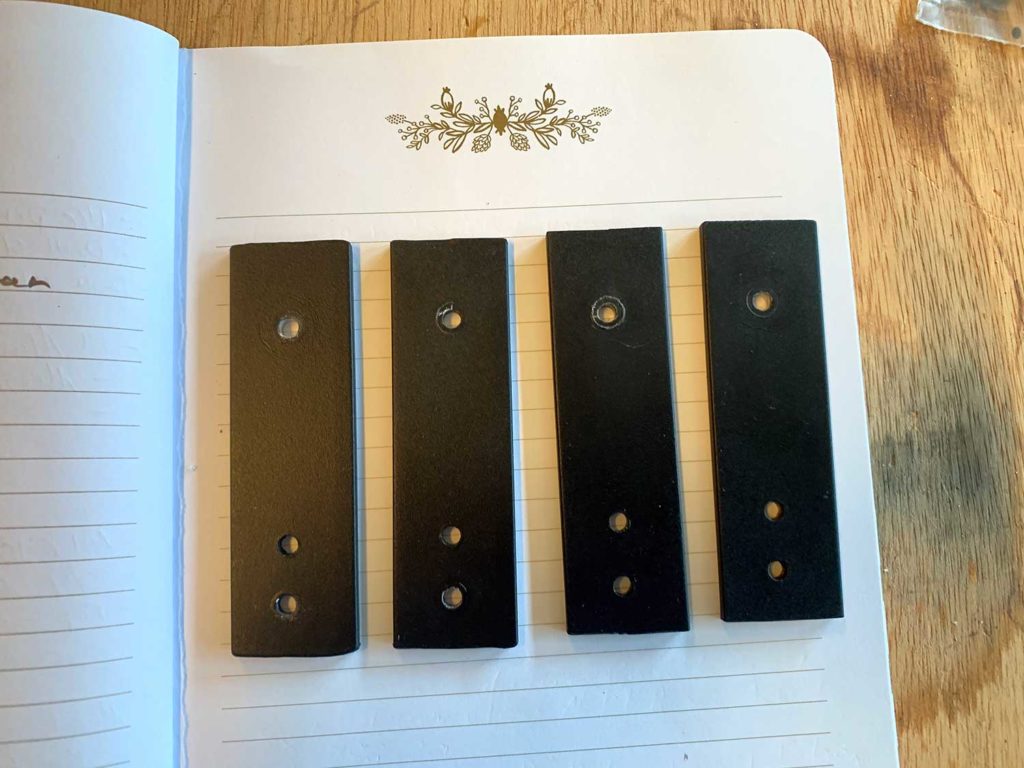
10. Drill Holes for Mounting Screws in Metal Brackets
Similar to cutting the metal brackets, drilling the holes for the mounting screws in each bracket and keeping them in alignment can be a challenge depending on what tools you use. It’s important that all of the holes for the mounting screws align and are in the same position across all 4 brackets. If they are not aligned, the radio bodies will not sit evenly. You don’t want the holes to look like the photo below. This was one of my first attempts at the bracket and I tried to drill the holes with a regular hand drill.
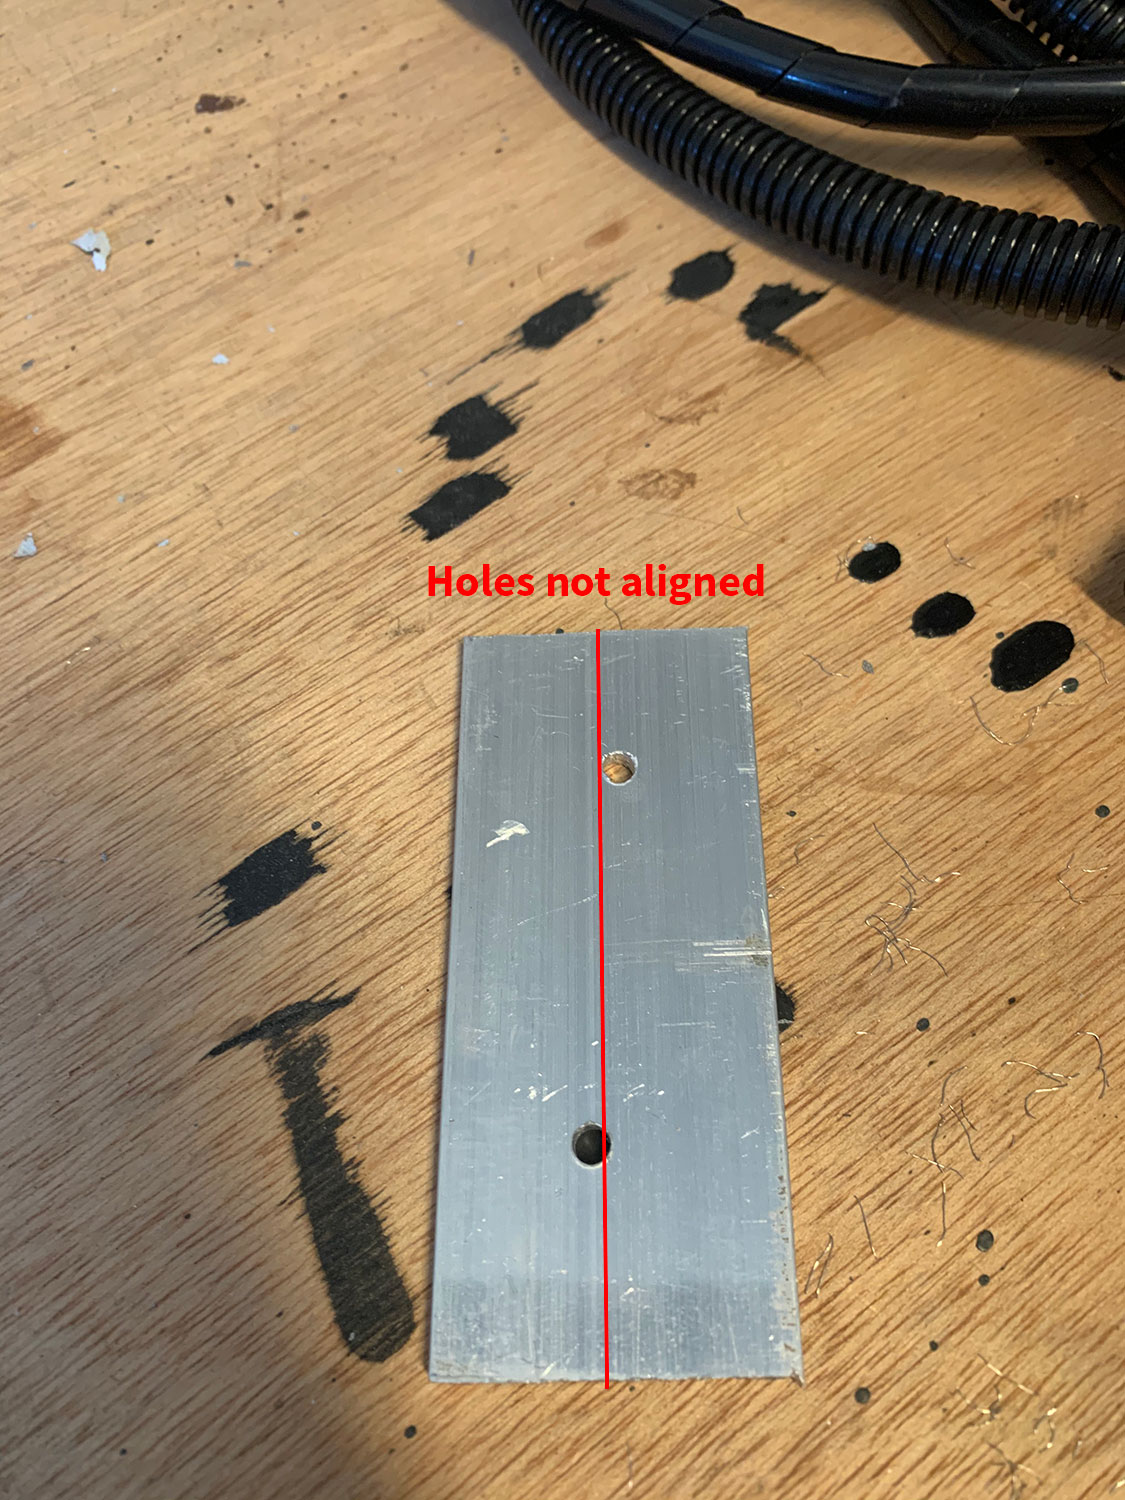
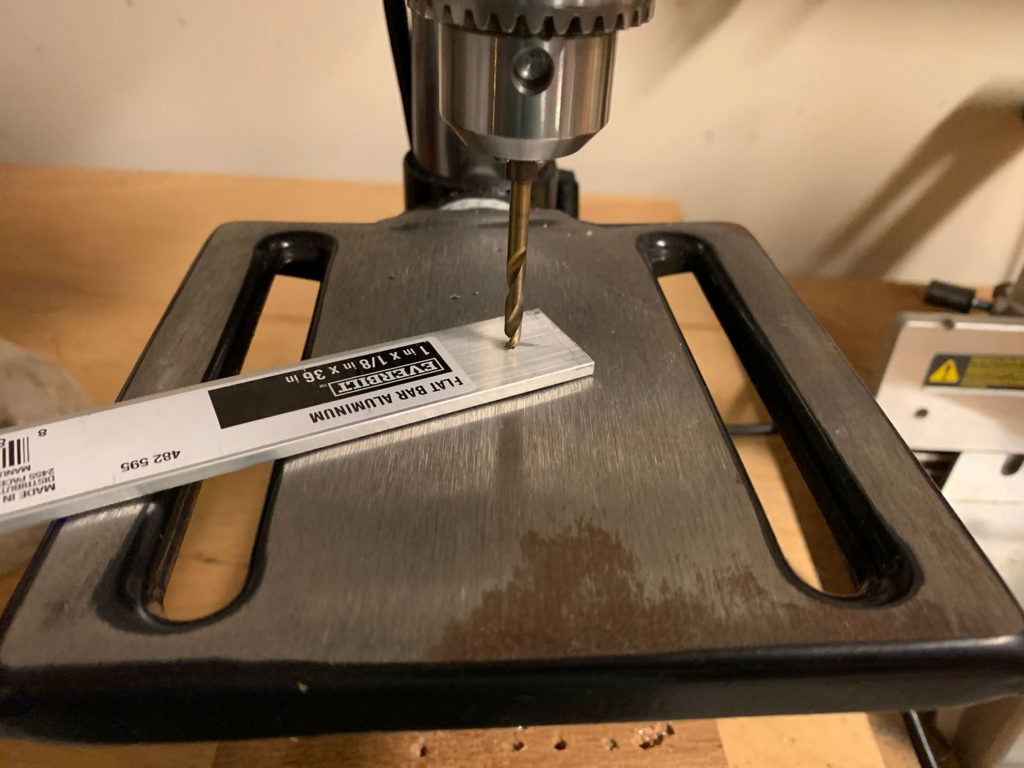
The easiest and most consistent way to drill the holes is to use a drill press. I didn’t own one when I started this project but ended up picking up a Harbor Freight Central Machinery 8″ 5-speed drill press which is good enough for home and hobby use. As of the time of this post, it is on sale for $54.99 – which was worth it alone just to save the frustration of trying to drill the holes consistently using a hand drill.
You can simply secure the metal bracket piece to the drill press table, lower the press spindle and place the drill bit exactly where you want it. Drill the holes in one bracket, then use that bracket as a guide to drill the holes in the other 3 brackets.
Use a 5/32″ drill bit suitable for metal such as the Milwaukee Red Helix 5/32″ Titanium bit to drill the holes for the mounting screws.
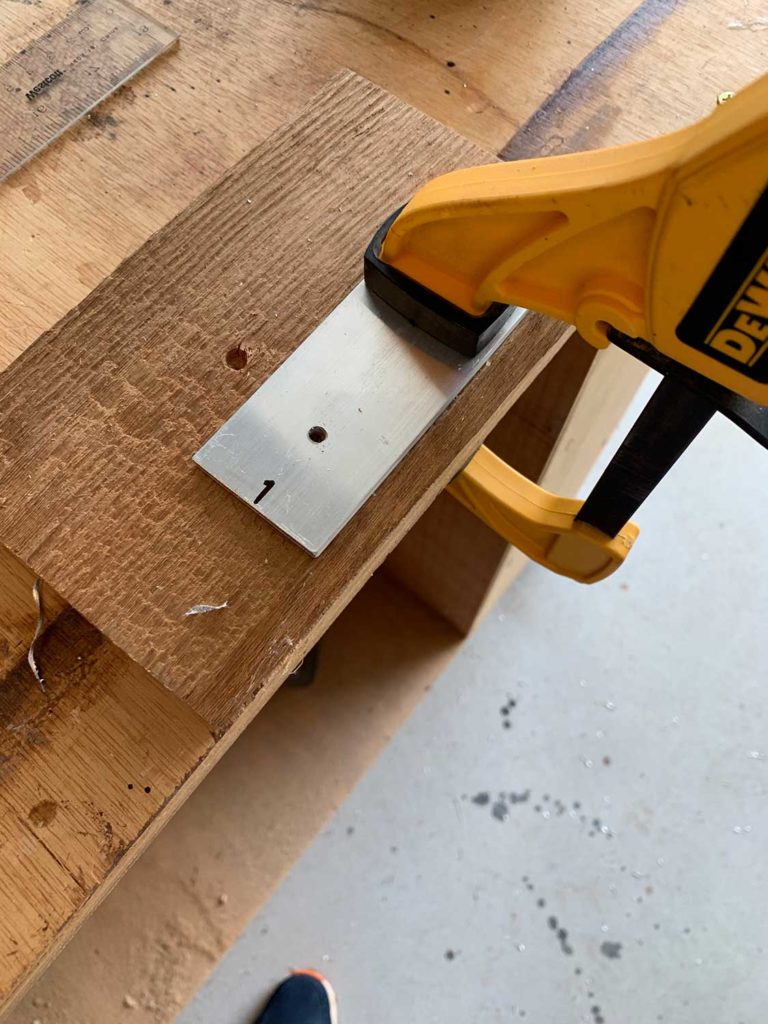
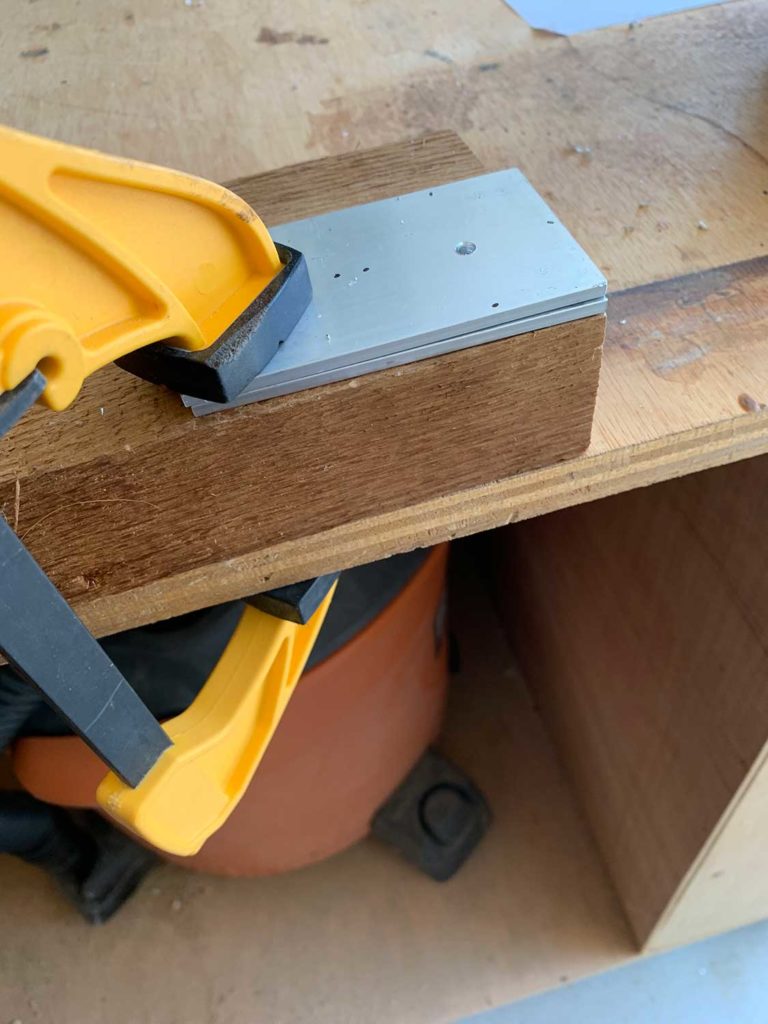
If you do plan to use a hand drill, you can improve the accuracy of the holes by clamping the metal bracket to a piece of wood and securing it in place with a caliper or bar clamp as shown below. Drill the holes in the first bracket, then use it as a guide to drill the holes in the remaining 3 brackets.
I would also suggest using a metal center punch to help keep the drill bit in the correct place. Use the punch to make an impression on the bracket where both of the mounting screw holes are. This will help keep the drill bit at the center of the hole and from sliding around on the bracket. When you start drilling the hole, rotate the drill bit slowly at first and then speed it up as the bit removes the metal.
11. Test Fit the Mounting Brackets
Now that the brackets are cut and all the holes for the mounting screws are drilled it’s time to test fit the brackets. You will need 2 sets of the Everbilt M4-0.7 socket cap screws and 5 sets of Everbilt #8 flat nylon washers.
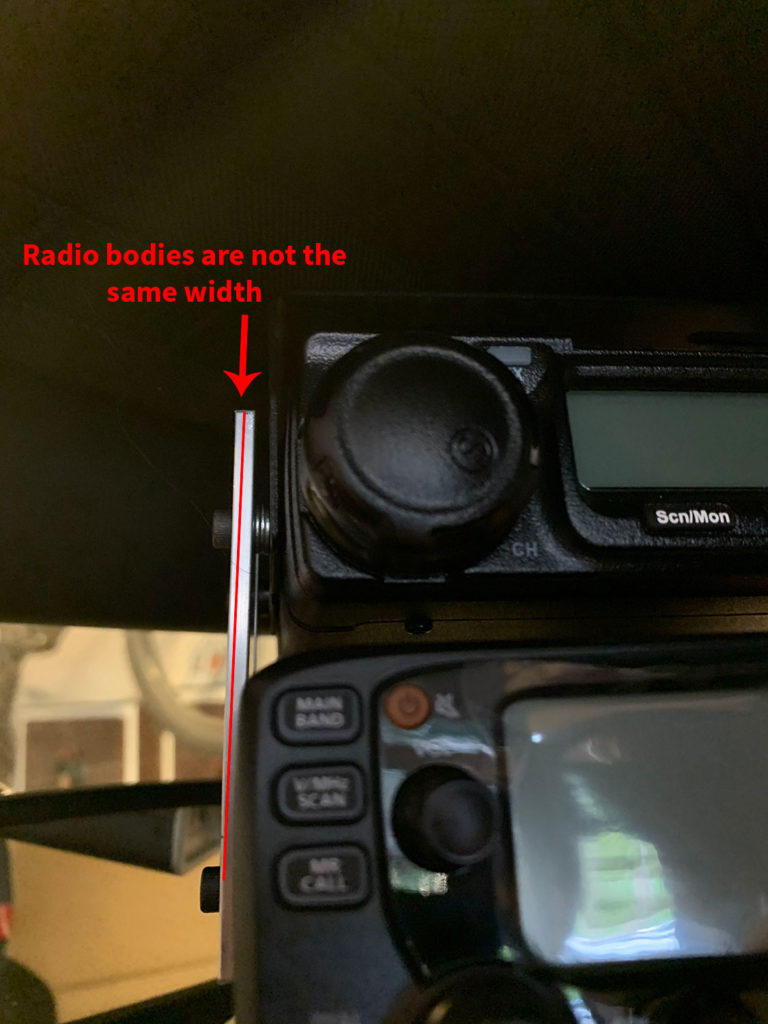
The width of the Icom IC-2730A radio body is wider than the radio body of the Midland MXT400. I used Everbilt #8 flat nylon washers to make the mounting brackets fit flush against both radios.
Gather the following hardware for each radio before you test fit the brackets:
Midland MXT400
Icom IC-2730A
Remove the mounting screws that came with the Midland MXT400. Attach each of the new mounting brackets using 4 nylon washers between the inside of the new mounting brackets and the outside of the Midland MXT400 mounting bracket. Secure each bracket in place with a nylon washer on the outside of the bracket and an M4-0.7 x 15mm socket cap screw, finger tight for now.
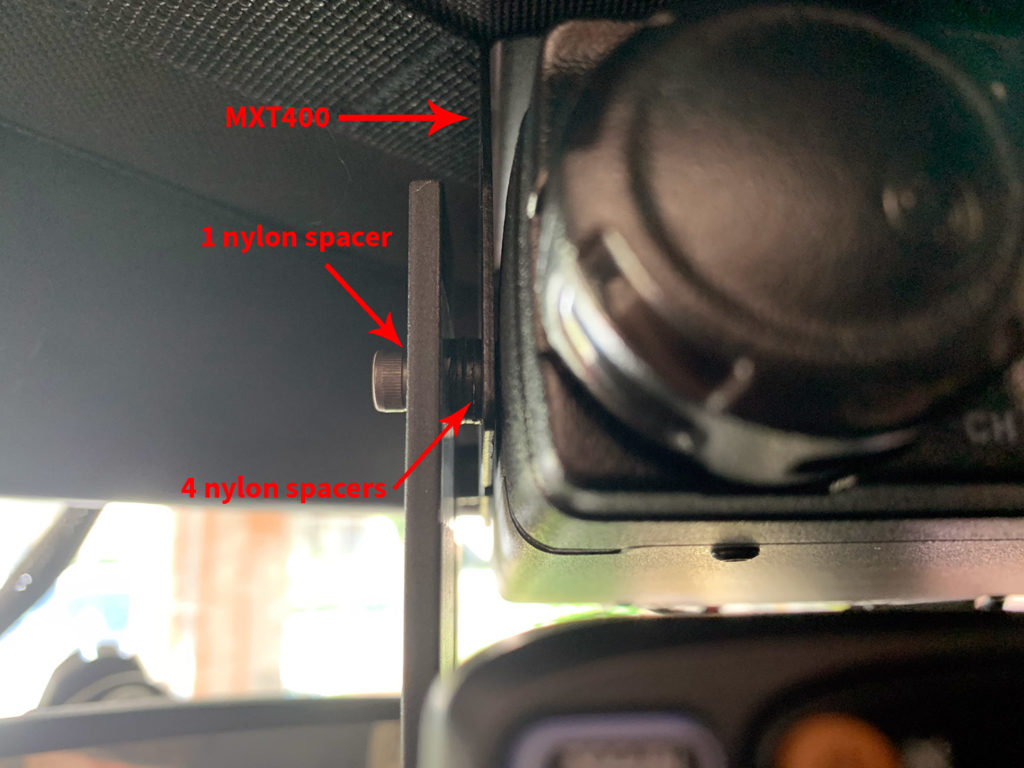
Hold the Icom IC-2730A radio body in one hand and attach it to the mounting brackets. Use a nylon washer on the outside of the bracket and M4-0.7 x 12MM socket cap screws. You do not need any nylon washers on the inside of the bracket.
Check for proper fit, alignment, and spacing once both radios are mounted. You can adjust the tilt angle of the Midland MXT400 by moving the rear mounting screws to different positions within the 3 notches at the rear of the Midland MXT400 mounting bracket (see the photo of this bracket at the top of the post) for reference.
Once you are happy with the fit, remove all of the mounting hardware. It’s time to prep, paint, and finish the mounting brackets.
12. Prepare and Paint the Mounting Brackets
I used the following primer, paint and clear topcoat:
- Rust-Oleum Clean Metal Flat White Primer (7780830)
- Rust-Oleum Flat Black Protective Enamel (7776830)
- Rust-Oleum Universal Dead Flat Clear Durable Topcoat (342482)
The instructions on the can for the flat white primer and flat black protective enamel state to “hold can upright 10-16″ from the surface and spray in a steady back-and-forth motion, slightly overlapping each stroke. Keep the can the same distance from the surface. Keep the can in motion while spraying. Apply 2 or more lights coats a few minutes apart.”
The instructions on the can for the dead flat clear coat state to “Hold can upright 8-12″ from surface and spray in a steady back-and-forth motion slightly overlapping each stroke. Keep the can the same distance from the surface. Keep the can in motion while spraying. Apply 3 or more light coats continuously, spraying off the surface with each coat. For best results, apply multiple light coats versus one heavy coat.”
I followed those instructions and sprayed 4 coats (each) of the primer, flat black protective enamel, and clear topcoat. I did each coat about 30-45 minutes apart and then let the paint dry overnight before mounting the brackets. Keep the outside temperature in mind with regards to the dry time, it was July in GA (90+ degrees) when I painted them.
I had to drill two sets of holes to move the Icom IC-2730A further down and I didn’t want to make a new set of brackets.
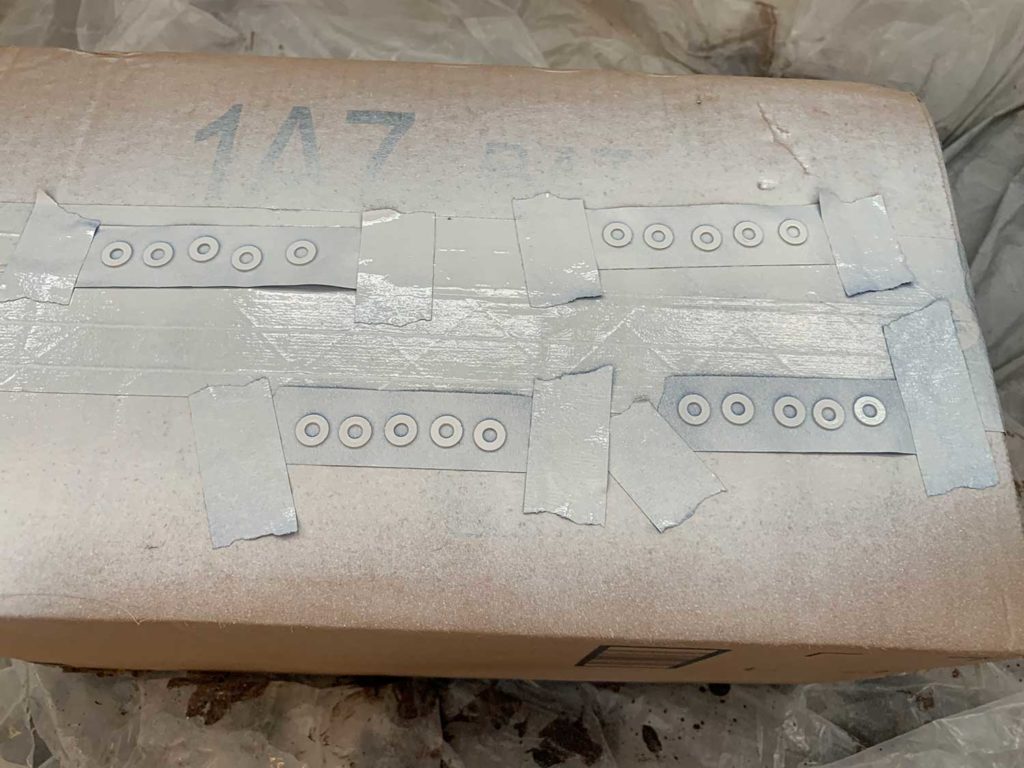
13. Prepare and Paint Nylon Washers
The nylon washers are white, so I painted them black so they blend in better with the black mounting brackets. This can be a little tricky – if you just set the spacers down on a surface and try to paint them the propellant from the spray paint will blow the washers all over the place. I used 4 pieces of blue masking tape and stuck each one of the spacers to the tape, then applied the primer and paint coats. I held the can further away from the washers when painting them to try and reduce the effect of the propellant.
Let the primer, paint, and clear topcoat fully dry before you remove the washers from the tape. I used the tip of a Xacto knife blade to gently lift each spacer and separate it from the tape so the paint did not peel away from the washer and stick to the masking tape adhesive.
14. Wrapping Up
Reassemble the radios, painted mounting brackets and painted nylon washers and you are done!
Up Next – Part 3
Part 3 of this series covers the installation of the radio antennas and mounting brackets so be sure to check it out next!

No Comments