
To Buy Or Build?
My house is only about 6 years old, but the shutters that were originally on the house were in bad shape. The boards were sagging and no longer even, and the paint was worn from weather exposure and needed to be stripped and re-painted. I even tried to reinforce each set of shutters with brackets to correct the sagging, but it didn’t work very well. I even tried to use a sandblaster to strip the paint off so I could salvage them!
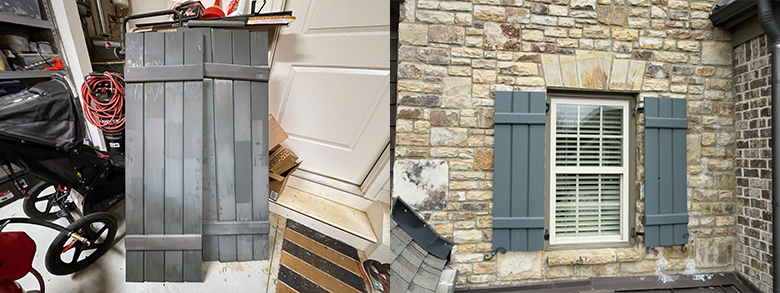
I decided it wasn’t worth the effort to try and salvage the original shutters, so I started shopping around to see what it would cost to buy them new. After a bit of searching around, I found that I was looking at $200+ per pair (hint – the shutters sets that are less than $200 a pair are usually smaller in height, or around 36″ tall) to buy a set that looked like they were of decent quality. I have 5 pairs of shutters on the front of my house, so the decision was made. It would be cheaper and easier to just build new shutters from scratch.
The video above walks you through the entire process from start to finish and explains how to build your own DIY wood shutters of the ‘board-and-batten or farmhouse style.
The material cost for 1 pair of shutters is $149.57 (small or large size) plus the cost of paint as of the time of this post. That also factors in the high cost of cedar lumber at $29.76 per 12-foot board in my area of the Southeast US.
To go along with the video, I put together a downloadable 5-page PDF plan set that includes everything you need to build a set of board-and-batten or farmhouse style DIY window shutters. The plan set includes all measurements and dimensions for 2 shutter sizes to match large and small windows. Each shutter size is shown in front and side views, along with a full parts cut list. The video above shows you exactly what to do at every step to build your new set of shutters!
Purchasing the plan set is risk-free. If you have any problems with your order and I will refund the entire purchase price. Just send me an e-mail and let me know why.
Scroll down to see the full materials and tool list for this project.
This is a preview of the actual plan set.
The version you receive will include all measurements and dimensions.
Before we get started I’d like to ask you for a favor. If you find this post useful please consider supporting this site by purchasing any of the items listed in the post through the links provided. The links to Amazon are affiliate links, and the small commission that I may earn keeps this site running so I can continue to provide helpful information.
Lumber & Materials
- 6″ x 0.75″ x 12′ Cedar Board – Home Depot
- Buy 3 boards for one set of small or large shutters (left and right sides)
- Shutter Hinges – Amazon
- 2 sets per pair of shutters (4 total)
- #6 x 1″ Drywall or Wood Screws – Home Depot
- Used to attach the horizontal supports
- #8 x 5/8″ Wood Screws – Home Depot
- Used to attach the shutter hinge brackets
- Titebond III Ultimate Wood Glue – Amazon
- Sherwin Williams Multi-Purpose Latex Primer – Sherwin Williams (1 quart)
- Sherwin Williams WoodScapes Exterior House Paint – Sherwin Williams (1 quart)
Optional Primer & Paint
If you want to paint the shutter hinges a different color you can use the following primer, spray paint and top coat:
- Rust-Oleum Clean Metal Flat White Primer (7780830) – Amazon
- Rust-Oleum Flat Black Protective Enamel (7776830) – Amazon
- Rust-Oleum Universal Dead Flat Clear Durable Topcoat (342482) – Amazon
Tools
These are the tools that I used or mention in the video:
- Miter Saw
- I use a Dewalt 12″ sliding compound miter saw. The Ryobi 10″ sliding compound miter saw or the Ryobi 10″ compound (non-sliding) miter saw are perfect for this project as well
- Table Saw or Circular Saw
- If you use a circular saw consider also using a straight edge system to make sure the cuts are straight and accurate.
- Ryobi Oscillating Multi-Tool (P343B) – Amazon
- DeWalt Sanding Pad for Oscillating Tools – Amazon
- 80 and 120 Grit Sanding Pads – Amazon
- Bosch Colt Palm Router (PR10E) – Amazon
- Irwin 45 Degree Chamfer Router Bit – Amazon
- Ryobi Cordless Drill (P208) – Amazon
- 36″ Bar Style Woodworking Clamps – Amazon (Qty: 3)
- Tape Measure – Amazon
- Screwdriver – Amazon
- Drill Bit Set – Amazon
- Used to drill pilot holes for shutter hinge bracket screws
- Irwin 1/4″ Woodworking Chisel – Amazon
- Used to remove dried wood glue
- Rubber Mallet or Hammer – Amazon
- Used along with the chisel above to remove dried wood glue
- 1.5″ Angled Paint Brush for Latex Paints – Amazon (Qty: 2)
- N95 Protective Mask – Amazon
- Wear one of these masks while routing the beveled edge on the boards
- Kreg Multi-Mark Tool (KMA2900) – Amazon (Optional)
- This is a generally handy tool to have around to mark measurements and other associated tasks
- Dremel Rotary Tool – Amazon (Optional)
- I used a Dremel tool in the video to clean the old shutter hinge brackets
- This is not needed if you buy a set of new shutter hinge brackets
- 428 Carbon Steel Wire Brush – Amazon (Optional)
- I used this attachment to clean the old shutter hinge brackets
No Comments