
Thanks for stopping by Southeast4x4trails.com! If you are looking for a detailed guide on how to install a GMRS radio or Ham radio in your Jeep or off-road vehicle you have come to the right place. Keep reading for more details about this 5-part series on my radio install project.
If you have found your way here via Google, this site is about the Jeep, 4×4, and off-road community in the Southeast US. Check out the home page for an interactive Google map of trails, off-road parks, forest service roads, points of interest and more in the GA, TN, NC, and SC areas. The Journal has other articles similar to this one on topics of interest such as “how-to” guides, trails and places to visit, and local history. The Resources page has many links to mapping, GIS, USFS forest areas, and technical info.
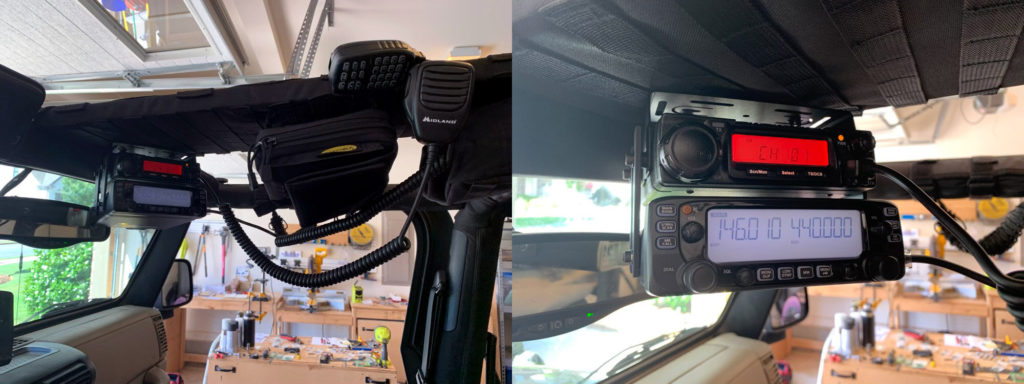
This is the first in a series of 5 posts that detail the install of a Midland MXT400 MicroMobile GRMS radio and Icom IC-2730A ham radio in my Jeep Wrangler TJ. You can adapt this information to any vehicle, it doesn’t have to be a Jeep TJ or even a Jeep!
This post will cover the background on the project, why I chose these 2 radios, and includes a complete list of all of the gear, tools, and parts that I used in this project.
If you want to jump directly to the install info just click one of the links below:
- Part 1 – Project Details, Gear, Parts and Tools
- Part 2 – Mounting the Midland MXT400 GMRS Radio and Icom IC-2730A Ham Radio
- Part 3 – Mounting the Radio Antennas
- Part 4 – Power, Wiring and Fuse Block Installation
- Part 5 – Radio Power Wiring and Antenna Coaxial Cable Installation
GMRS, FRS and Ham Radio
If you are not familiar with GMRS, it stands for General Mobile Radio Service. GRMS radios are widely used for short-to-medium distance two-way voice communication in the 462-467 MHz FM frequency range.
The use of GMRS/FRS radios in the off-road world has been growing every year. Simply put, these radios are a considerable improvement over older CB radios because they can operate at higher power levels (1-50 watts) and broadcast an FM signal. Higher power levels translate into much better voice quality and range (distance) as compared to CB radios, which operate on AM frequencies between 26-27 MHz at 1-4 watts. In fact, Midland is the official communications sponsor for the 2020 Jeep Jamboree USA. Jeep has also announced that all communications for the 2021 Jeep Jamboree USA will be on GRMS/FRS frequencies and no CB frequencies. This article about the Jeep Jamboree does a good job of outlining the key factors in the shift towards GMRS/FRS radios.
Use of GMRS radios is licensed in the US by the FCC, but it doesn’t require a test like the Amateur Radio (Ham) services does. You can purchase a GMRS license directly on the FCC Universal Licensing System (ULS) website. The cost is $70 for 10 years and it covers anyone in your immediate family in addition to yourself. That means your wife/huband and kids can all legally operate GMRS radios under one license. You will be issued a call sign by the FCC when the license is granted (mine is WHRT850). Check out this page at ITS Tactical and Wikipedia for more info on GMRS radios.
FRS stands for Family Radio Service. FRS radios are permitted to transmit on the same frequencies that GRMS radios operate on. No FCC license is required to operate FRS radios, however. For more details about the difference between GMRS and FRS radios see the next section below – GMRS and FRS – What’s the Difference?
Amateur radio or “ham” radio is it is commonly known requires an FCC license (my call sign is KG4LNA) to operate legally. There are a number of different bands within the larger radio spectrum that are dedicated to ham radio operation. Two of the most popular bands are the 2 meter and 70 cm bands which someone with the entry-level technician license can operate on. The Icom IC-2730A radio featured in this post is a dual-band radio that can operate on both of these bands.
I mainly use my ham radio for backup and emergency communications. There are many ham radio repeaters around the country. If you are able to reach one of these repeaters while out on the trail or in the backcountry a repeater has the ability to re-broadcast (repeat) your signal at higher power and distance that you would be able to reach if just talking from one ham radio to another (simplex mode). To learn more about ham radio take a look at this page from the AARL.
GMRS and FRS – What’s the Difference?
GMRS and FRS radios share a total of 22 dedicated channels in the 462.5625 to 467.7250 frequency range. Each of these frequencies are labeled as a channel – 1 to 22. Both GRMS and FRS radios can operate on any of the channels, but the power output for FRS radios is capped at 2 watts for channels 1-7 and 15-22 and 0.5 watts for channels 8-14.
GRMS radios are capped at 5 watts for channels 1-7, 0.5 watts for channels 8-14, and 50 watts for channels 15-22. Channels 15-22 also permit the operation of GMRS repeaters which can greatly extend the signal distance and coverage if a GMRS radio has repeater capability. This is very similar to repeaters that operate on the ham bands as mentioned above.
No license is required to operate on FRS channels/frequencies. FRS radios are also required by law to have a non-removable or fixed antenna and the radio cannot be modified to operate at higher power outputs than specified by the FCC for a given channel. FRS radios are often “walkie-talkie” types that are sold together as a pair. GMRS radios can utilize a non-fixed external antenna to extend their operating range. The following pages on RadioReference.com detail FRS and GRMS channel specifics and also have a combined channel chart.
Project Background and Details
This radio install project started with just the Midland MXT400 GMRS radio. I installed it in my Jeep and mounted the antenna on the tire carrier rear bumper. One Google search lead to another while I was doing the install, and after a couple of hours reading forum posts on RadioReference.com I came to understand that mounting any radio antenna on the rear of a Jeep Wrangler is not a good choice if you want to maximize the signal range, quality of your radio communications and the radio’s overall performance.
Why? Because typically there are multiple obstructions in the rear of Jeep (tire carrier, hard/soft top, other radio antennas, etc.) that affect the path and emissions of the RF waves that your radio antenna transmits. It alters the radio wave propagation pattern which means it impacts (makes it worse) the radio’s performance.
As I was doing my research on the best place to mount the radio antennas I posted a question on the Amateur Radio Antenna sub-forum on RadioReference.com. I was fortunate enough to have several very, very knowledgable, and helpful people respond to my post and help me figure out an installation plan that would be the best for my Jeep and communication goals. The simple install for the Midland MXT400 turned into a full-blown project and grew to include the Icom IC-2730A ham radio and even my Uniden SDS100 radio scanner.
Between the time that I spent researching the radios and associated gear, reading threads on forums, discussing the plan with others on the thread that I started on RadioReference.com I spent over 40 hours alone just planning out the entire installation project. This is before I even started the install work. This series of posts will walk you through each step of the install and will literally save you many hours of research and planning (and some frustration too). I’m sharing it for the benefit of others because I would have loved to come across the information as I put my project together.
If you would like to read the original forum post and all the responses, take a look at Multiple Antenna Question for 2M/70CM. It also details information about the antenna install for my Uniden SDS100 scanner. You can also find more information about why mounting any antenna in the rear of a Jeep is not a good idea on this thread on jk-forum.com.
Why the Midland MXT400?
I have several handheld radios that are capable of operating on GRMS frequencies. These handheld radios often operate at a lower power output such as 4 or even 1 watt, and I knew that I wanted a GMRS radio that was capable of higher power output to maximize range on the trail. I also wanted a permanently mounted radio in the Jeep as well. After looking at several different mobile GMRS radios and reading reviews the Midland brand was showed up in many of the reviews or articles and the comments were generally favorable of their products.
The Midland MXT400 has a max output of 40 watts. It also does not require any programming. All of the GMRS and FRS radio channels are pre-programmed right out of the box. You simply turn the dial on the radio to set the channel you want to operate on.
It is also compatible with other radios (such as Midland’s) that can transmit on GMRS or FRS frequencies. If others in your group don’t have a GMRS license, they can use an FRS radio legally and the MXT400 will work seamlessly with those radios.
The MXT400 also has the capability to use PL Tone (CTCSS) and DCS codes. These codes are set to the same values on both radios, and the only way anyone else using the same frequency will be able to receive your communications is if they also have the same PL Tone or DCS code set that you are using. Midland refers to these codes as “privacy codes”. For more information on these codes see pages 17 and 26 in the MXT400 owner’s manual.
Why the Icom IC-2730A?
The Icom IC-2730A is a dual-band VHF and UHF radio. It can transmit at up to 50 watts on the 2-meter ham band (VHF) between frequencies 144-148 MHz and 70 cm ham band (UHF) from 430-450 MHz. It has dual watch/dual receive capabilities, which means that it can receive signals on either band simultaneously. This is useful if you want to stay tuned to a specific frequency such as a repeater or simplex (say a 2-meter frequency) but also want the ability to receive or scan frequencies on another band (say a 70 cm frequency). The radio has 2 sets of controls – one for each band (volume, squelch, etc.) You can scan a bank of frequencies that are programmed into the radio while the other frequency is stationary.
The IC-2730A also has a large channel memory at 1,000 channels. This was important to me as I have my IC-2730A programmed with both 2-meter and 70 cm repeaters in GA, TN, NC and SC. This adds up to about 800 different frequencies across all 4 states. I printed out a list of all the programmed channels along with their name and location, and I keep this with me in my Jeep. That way I don’t have to program the radio every time I go to a different state, I can just set the radio to scan mode for the bank of channels that are in the vicinity of my location.
I compared several 2-meter/70 cm dual-band radios from other companies such as Kenwood, Yaesu, and Alinco and felt that the price and feature set of the IC-2730A was the best value. Several of these other radios were in the $300-$550 dollar range. The controller (display) on the IC-2730A can be mounted either on the radio main unit with the Icom MBA-4 or remotely from the radio main unit with the MBA-5 controller bracket and MBF-1 remote mounting base. I knew that I wanted to mount the controller display to the main radio unit, so I also purchased the MBA-4 bracket.
The display is also easy to see. The frequency numbers are large and visible at a glance. That was important to me as I mounted the radio just outside of my direct line of sight. Another plus is that the radio’s receive frequency range allows it to operate as a wideband receiver covering aviation, marine, and weather radio frequencies between 118-174 and 375-550 MHz. It is also fairly easy to program with a computer using the RT Systems USB-29A programming cable and WCS-2730 software once you get the hang of how the software works.
Wrapping Up
I am by no means a GMRS or Ham radio expert. I learned a lot (really, a lot) about radios, antennas, and electrical concepts in general throughout this project. I’m sharing what I learned with you and hopefully you will find it useful. If you have questions please post a comment and I’ll do my best to respond. The RadioReference.com forums are a great source of information and help as well.
I’d like to ask you for a favor. If you find this post useful please consider supporting this site by purchasing any of the items below through the links provided. The links to Amazon are affiliate links, and the small commission that I may earn keeps this site running so I can continue to provide helpful information.
Radio Gear, Parts & Tools
Radio Gear:
- Icom IC-2730A VHF/UHF Dual Band Transceiver (Ham Radio) – Amazon – Ham Radio Outlet or GigaParts.com
- Midland MXT400 MicroMobile Two-Way GRMS Radio – Amazon or Midland
- Icom MBA-4 Controller Mounting Bracket – (For Icom IC-2730A) – Ham Radio Outlet or GigaParts.com
- Lind SDT1230-022 Shutdown Timer – Amazon – Lind
- I bought two of these in new condition on eBay for $22.99
- The normal retail price from Lind is $81.95
- Larsen NMO2/70B Antenna (For Icom IC-2730A) – Antenna Farm or Arcadian / Arc Antenna
- Larsen NMO450CHW Antenna (For Midland MXT400) – Antenna Farm or Amateur Radio Supplies
- Laird SBT3400 NMO Straight Antenna Mounting Bracket (Qty: 4) – Antenna Farm
■ NOTE: This straight-style bracket will NOT work with a Jeep JK or JL. You will need a JK or JL-specific bracket with a 3/4″ NMO hole such as this one from Antenna Farm or Topsy Products. - Larsen NMOKHFUD NMO 3/4” Antenna Coaxial Cable w/ No Connector (Qty: 2) – Antenna Farm or Arcadian / Arc Antenna
- RFI RFU-505-ST PL-259 UHF Crimp Style Coaxial Cable Connector (Qty: 2) – Antenna Farm or Ham Radio Outlet
- Smittybilt G.E.A.R Overhead Console for Jeep TJ (5665001) – Extreme Terrain– Quadratech
- This console is also available for a Jeep JK
- Magnetic Mic Radio Microphone Mount (Optional) – Amazon
Tool List:
NOTE: This is a list of the specialty tools that I used for the install. Other common tools (drill, screwdrivers, etc.) are required as well.
- IWISS Ratchet Crimping Tool Set w/ 22-10 Gauge Wire Die – Amazon
- This tool is for the smaller 10-22 AWG gauge wire terminals
- You can also use a fixed crimping tool like the Klein Tools 1000 – Amazon
- Fryic Ratchet Crimping Tool for 20-7 AWG Wire – Amazon
- This tool is for the larger 8 gauge wire terminals
- LP DL-801G Ratchet Crimping Tool for RG58 Coaxial Cable – Ham Radio Outlet
- TerraWave HT-312B RG-58 Coaxial Cable Stripper – Antenna Farm
- Wagner Spraytech 0503008 HT1000 Heat Gun – Amazon
- AstroAI DM6000AR Digital Multimeter – Amazon
- Surecom SW-102 S0239 Digital SWR Meter – Amazon
- Antenna Farm 8219-3-PL259-C 3 Foot RG-58 Coaxial Jumper Cable – Antenna Farm
- Milwaukee 1-1/4” Hole Dozer Hole Saw Drill Bit (49-56-9664) – Home Depot
- Milwaukee 48-89-4607 Shockwave 5/32” Titanium Drill Bit – Amazon
- Milwaukee 48-89-4609 Shockwave 3/16″ Titanium Drill Bit – Amazon
- Milwaukee 48-89-2311 Red Helix Hard Metal 7/32″ Cobalt Drill Bit – Amazon
- Dremel Rotary Tool – Amazon
- Dremel 428 Carbon Steel Wire Brush – Amazon
- Wera PH0 Precision Screwdriver – Amazon
- Xacto Black Gripster Knife – Amazon
- Ryobi 9340 Rotary Tool – Amazon
- Tool cut aluminum/metal brackets
- Dremel MM485 Carbide Flush Cut Oscillating (Rotary) Blade – Amazon
- Rotary blade/bit to cut metal brackets
- Ryobi P5231 Jigsaw – Amazon
- Second tool option to cut aluminum/metal brackets
- Bosch T121AF3 Metal Jigsaw Blades – Amazon
- Jigsaw blade/bit to cut metal brackets
- Kreg KMA2900 Multi-Mark Multi-Purpose Marking and Measuring Tool – Amazon
- One of my favorite mark/measure tools – for transferring measurement marks from paper template to aluminum/metal brackets
Parts List:
- Daystar Universal Firewall Boot (KU20040BK) – Amazon – Quadratech
- Insultherm High Temp Braided Sleeving – 1.5″ and 5/8″ Diameter – Wire Care
- Blue Sea Systems ST Blade ATO/ATC Fuse Block (6 Circuit w/ Negative Stud Terminals ) (5025) – Amazon
- Blue Sea Systems Maxi Fuse Block / In-Line Fuse Holder (5006) – Amazon
- WindyNation 8 AWG Gauge Pure Copper Flexible Cable Wire – 30 Feet, Red (Battery Positive) – Amazon
- Windy Nation 8 AWG Gauge Pure Copper Flexible Cable Wire – 15 Feet, Black (Battery Negative) – Amazon
- Belden 14 Gauge Primary Wire in Red, Black (25 Feet) – NAPA Auto Parts
- Selterm Heavy Duty Bare Copper Terminals for 8 AWG Gauge Wire, #10 Ring Stud – Amazon
- Selterm Heavy Duty Bare Copper Terminals for 8 AWG Gauge Wire, 1/4” Ring Stud – Amazon
- Blue Sea Systems 30 Amp Maxi Fuse (5138) – Amazon
- NAPA Auto Parts In-Line Mini Fuse Holder (784667) – NAPA Auto Parts
- Blue Sea Systems Contura II Off-(ON) SPST Switch – Amazon
- Littelfuse ATO 15 Amp Smart Glow Fuse (Qty: 2) (0AT0015.VPGLO ) – Amazon
- Littelfuse 5 Amp Mini Fuse (0MIN005.VP) – Amazon
- Dorman 16-14 Gauge Butt/Crimp Connectors (85436) – Advance Auto
- Dorman 16-14 Gauge 1/4″ Ring Terminal (85409) – Advance Auto
- NAPA Auto Parts 16 to 14 Gauge Step Down Butt/Crimp Connector – NAPA Auto Parts
- MaxBrite 16-14 Gauge Fully Insulated Female Disconnect Terminals – Amazon
- Ideal Ground Screws (774042) – Home Depot
- Tyco Electronics Raychem #10 Heat-Shrink Spade & Ring Terminals for 16-14 Gauge Wire – Home Depot
- Storehouse 42 Piece Marine Heat Shrink Tubing (Qty: 2) – Harbor Freight Tools
- XHF 160 Piece Clear Heat Shrink Tubing – Amazon
- Gardner Bender 3/8” & 1/2” Electrical Split Flex Tubing (FLX-538C10) – Home Depot
- Gardner Bender 3.5 Foot Wire Spiral Wrap (FLX-538C10) – Home Depot
- Permatex Clear RTV Silicone Adhesive Sealant (765-1344) – Amazon
- Gorilla Glue Clear Epoxy (4200101) – Amazon
- Gorilla Glue Heavy Duty Mounting Tape – Amazon
Hardware List:
- Everbilt #10-24 1.75″ Phillips Round Head Machine Screws (473684) – Home Depot
- Everbilt #10-24 Aluminum Machine Nut Screws (809048) – Home Depot
- Everbilt #10-24 Stainless Steel Nylon Lock Nuts (800121) – Home Depot
- Everbilt Flat Aluminum Bar 1”x36”x1/8” (887480019377) – Home Depot
- Everbilt #10 ID x 5/16” OD X 1” Long Aluminum Spacers (596-680) – Home Depot
- Everbilt M4-0.7x10MM Socket Cap Screws (574-128) – Home Depot
- Everbilt M4-0.7x12MM Socket Cap Screws (574-145) – Home Depot
- Everbilt M4-0.7x15MM Socket Cap Screws (564-012) – Home Depot
- Everbilt #10-32×1/2” Stainless Steel Round Head Machine Screw (Qty: 6) (476-222) – Home Depot
- Everbilt #10-32 Stainless Steel Nylon Locknut (Qty: 6) (317-647) – Home Depot
- Everbilt #10 Stainless Steel External Tooth Washer (Qty: 6) (597-540) – Home Depot
- Everbilt #8 Flat Nylon Washer (595-030) – Home Depot (Radio Mount Spacers)
- Everbilt M4-0.7 X 8MM Phillips Flat Head Screw (574629) – Home Depot
- #6 x 5/8 Self Tapping Screws – Amazon
Paint & Primer:
- Rust-Oleum Clean Metal Flat White Primer (7780830) – Amazon
- Rust-Oleum Flat Black Protective Enamel (7776830) – Amazon
- Rust-Oleum Universal Dead Flat Clear Durable Topcoat (342482) – Amazon
- Mopar Body-Color Touch Up Spray Paint – Quadratech
Up Next – Part 2
Part 2 of this series covers how I mounted both radios using a Smittybilt G.E.A.R overhead console and a set of custom made mounting brackets.

6 Comments
Jay
April 6, 2021 at 4:15 pmMinor clarification on PL tones…it’s better to think of them as a filter, so you only hear other signals carrying the same time. However, anyone listing on the channel without a receive tone set (no “filter”) will be able to hear everything. The manufacturers referring to the as “privacy tones” is a little misleading, imo.
Colby
April 6, 2021 at 4:41 pmHey Jay –
Thanks for the comment and this is a good thing to point out. I think the manufacturers came up with “privacy tones” from a marketing perspective, so it can be misleading. For the benefit of others that read this post assume your transmissions are open and can be received by anyone on GMRS or Ham frequencies.
Ron Gilbert
May 9, 2021 at 6:36 pmColby, I was in the process of installing the MXT400 in my 2012 JKU and came across your write up. I can’t thank you enough for taking all the time to put this out, it has definitely save me a bunch of time and prevented some mistakes I’m sure. I just spent the afternoon ordering everything and also found a MOLLE panel for the JKU, https://www.jcroffroad.com/product/JKOMP-PC.htm. Thanks very much.
Colby
May 10, 2021 at 11:24 amThanks for the comment Ron! I always appreciate it when readers reach out when they find something useful. I’d love to see photos of the finished install. You can tag me on Facebook at @Southeast4x4Trails.com.
Lyle
November 15, 2021 at 3:20 pmHello and pardon, was wondering why the midland and not the wouxon 1000g?
Colby
November 15, 2021 at 5:18 pmHi Lyle,
The Midland MTX400 offered what I was looking for when I did this project. Midland as a brand had a good reputation and also supported the Jeep community as well. I’m not familiar with the Wouxon 1000g but you could adapt the install to it, just adjust accordingly for the size of 1000g. Thanks for the comment and question!