
I recently replaced the rear Dana 44 axle in my TJ. I spent a decent amount of time reading Facebook group and forum posts about what coating is the best to use when refinishing an axle. Suggestions included high-temperature spray paint, powder coating or POR-15. I have used spray paint before but wanted to use a coating that would hopefully be more durable long-term, so I decided to go with POR-15.
POR-15 markets itself as an automotive and industrial coating that is tough, does not crack, chip or peel and permanently stops rust as well. I also liked that the suggested application process included a cleaner/degreaser and metal prep solution that goes on first before the POR-15 coating itself since preparation is often the key to getting a good end result. You can read more about the application process on the POR-15 website.
Here is the full list of the POR-15 products and materials I used:
■ POR-15 Cleaner Degreaser (Product # 40104, 1 quart)
■ POR-15 Metal Prep (Product # 40204, 1 quart)
■ POR-15 Rust Preventative Coating (Product # 45404, Semi-Gloss Black, 1 quart)
■ POR-15 Top Coat (Product # 45904, Chassis Black, 1 quart)
■ Zep 32oz High Output Chemical Sprayer (To Spray the Cleaner Degreaser)
■ Home Depot HDX 1 Quart Mixing Buckets (1 for POR-15 Coating, 1 for Top Coat)
■ Home Depot Best 2 Inch Trylon Thin Angle Brush
■ Home Depot 9′ x 12’ 0.7 Mil Drop Cloth
Before we get started I’d like to ask you for a favor. If you find this post useful please consider supporting this site by purchasing any of the items above through the links provided. The links to Amazon are affiliate links, and the small commission that I may earn keeps this site running so I can continue to provide helpful information.
One downside to POR-15 is that isn’t cheap. On Amazon the Cleaner Degreaser, Metal Prep, POR-15 and Top Coat are about $109 together. Most of the comments or reviews I read did say that it’s worth the price as it holds up well long term.
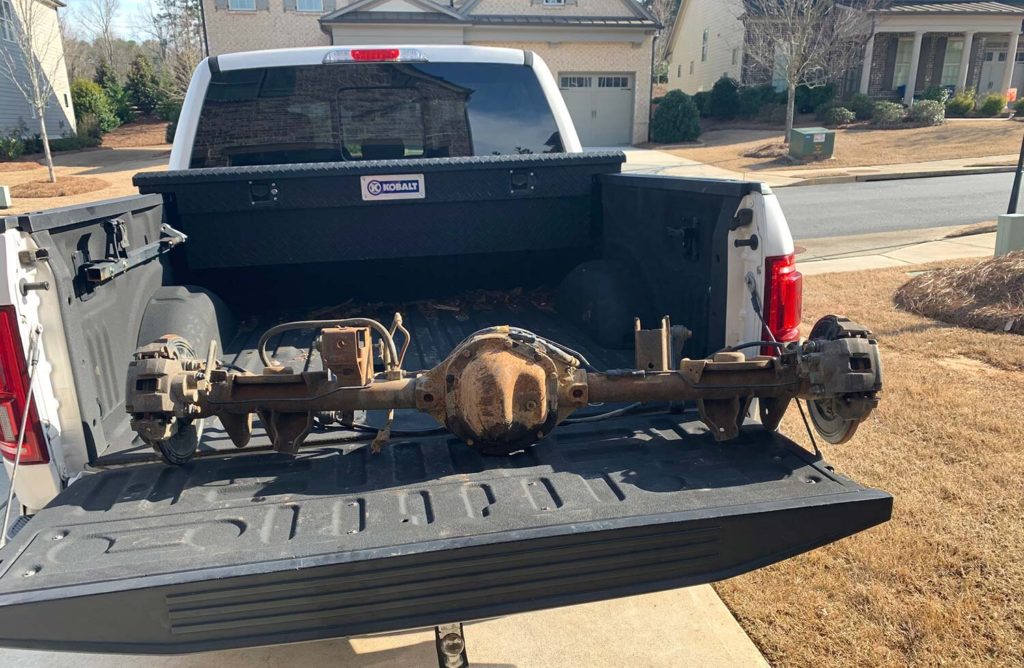
Here is the axle they day I picked it up. Rusty like most junkyard axles tend to be.
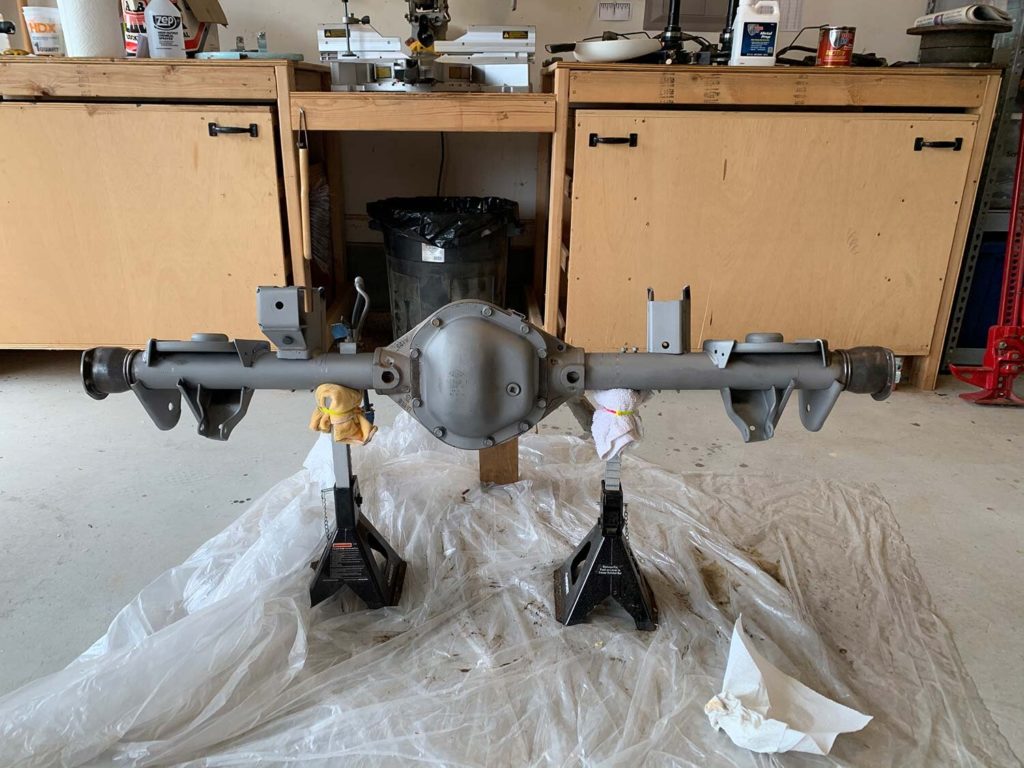
I had the axle sandblasted at a local shop, ProCryo in Cumming, GA. This is the best $50 I ever spent. It would have taken hours with an angle grinder and wire brush to get it anywhere near this clean.
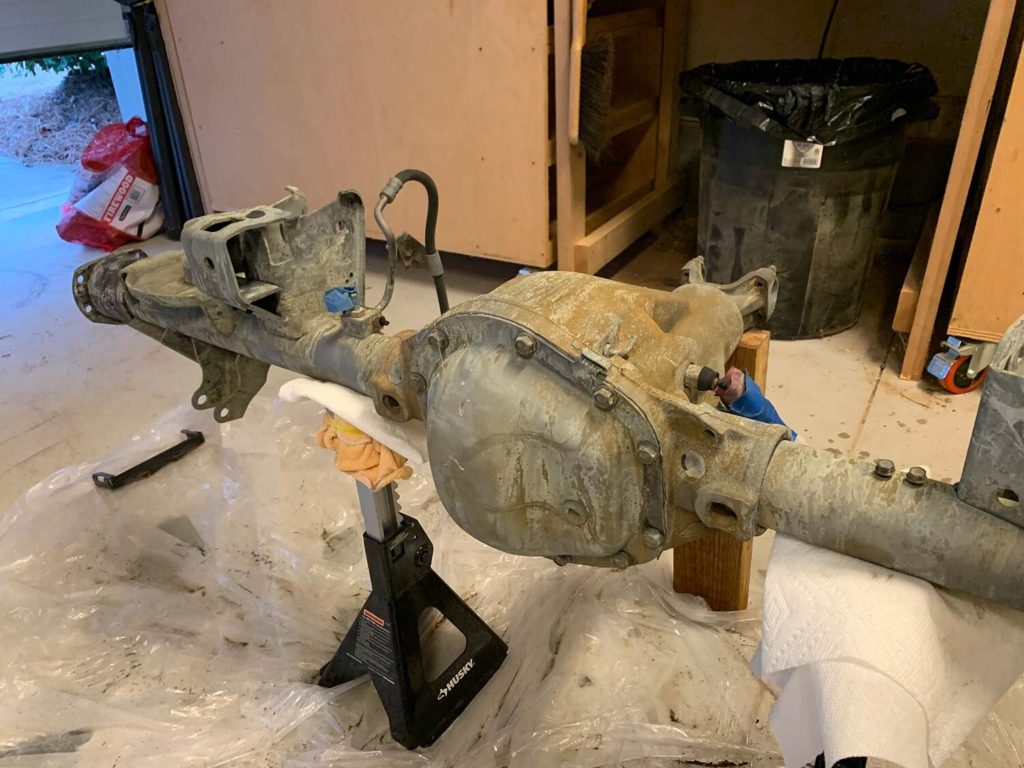
Before I started the POR-15 application process I used plastic bags and tape to wrap and protect the locker switch cable, the locker air input nozzle on the top of the housing and the brake line inputs (see photos below for reference).
The first step in the preparation process is to apply the POR-15 Cleaner Degreaser:
■ Mix the cleaner degreaser in a container (4:1 – 36 oz water to 8 oz cleaner degreaser)
■ Brush the mixture on with a paintbrush
■ Cover the axle multiple times on the top and bottom
■ Wash it off with water
Next, apply the POR-15 Metal Prep:
■ I poured the Metal Prep into a 32 oz Zep chemical sprayer bottle and covered the axle generously
■ Keep applying the Metal Prep to the axle for a period of 20 minutes
■ Wash it off with water after 20 minutes
■ Pat the axle dry with paper towels
■ Let the axle dry for 1-2 hours so it is “bone dry” before applying the POR-15 coating
POR-15 recommends that you apply 2 light coats of the POR-15 Rust Preventative coating. Here are a couple of tips on how to do that based on my experience:
- First, USE GLOVES. This stuff does not come off by scrubbing with soap and water or other cleaners. It basically has to wear off if you get it on your skin
- Use a decent quality paintbrush like the Home Depot “Best” 2 Inch Trylon Thin Angle Brush
- I actually used a new brush for each coat – both for the POR-15 Rust Preventative coating and the POR-15 Top Coat
- Yes, at $8 per brush it is a bit expensive to use a new brush for each coat but I didn’t want to deal with a stiff brush after it dried between coats. I wasn’t sure what kind of cleaner to use on the brush or how it would affect the POR-15 if the brush was cleaned with another chemical and re-used
- Pour a small quantity of the POR-15 Rust Preventative coating into a small container such as the Home Depot 1 Quart Mixing Bucket
- Mix by stirring in the can before use – do not shake to stir
- This stuff goes a long way and is easily spreadable – start with a small amount and pour more into the mixing bucket as needed
- Make sure you re-seal the POR-15 Rust Preventative coating after you pour it into the mixing bucket. The coating actually will dry in it’s can if you don’t – it is cured by moisture humidity
- Start applying by dipping just the tip of the paintbrush into the POR-15 and apply to the axle
- Take your time applying it so you don’t get drips or runs
- Let the first coat dry overnight or a similar time period
- The 2nd coat goes on a bit faster, so start with a little bit on your brush and add more to the coat as needed
- The 2nd coat feels “slicker” when applying as it’s going on top of POR-15 and not bare metal
I did 2 coats with the top of the axle housing pointing up, then two coats with the top of the housing pointing towards the ground. It took me 4 days to apply all 4 coats since I let each coat dry overnight each time.
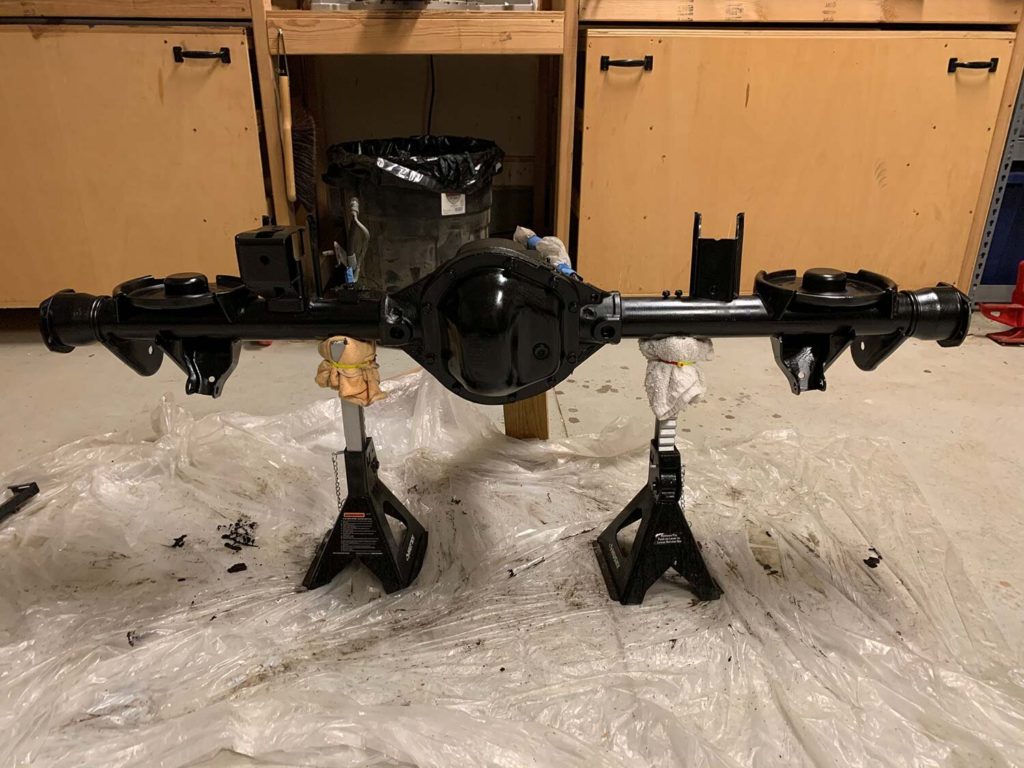
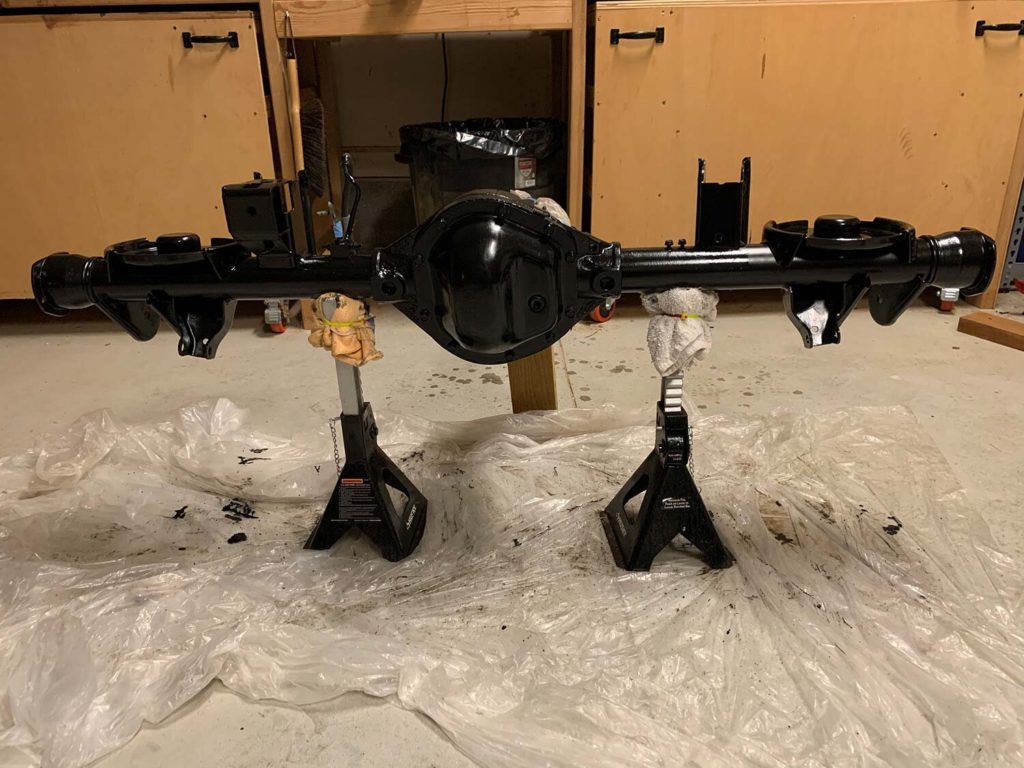
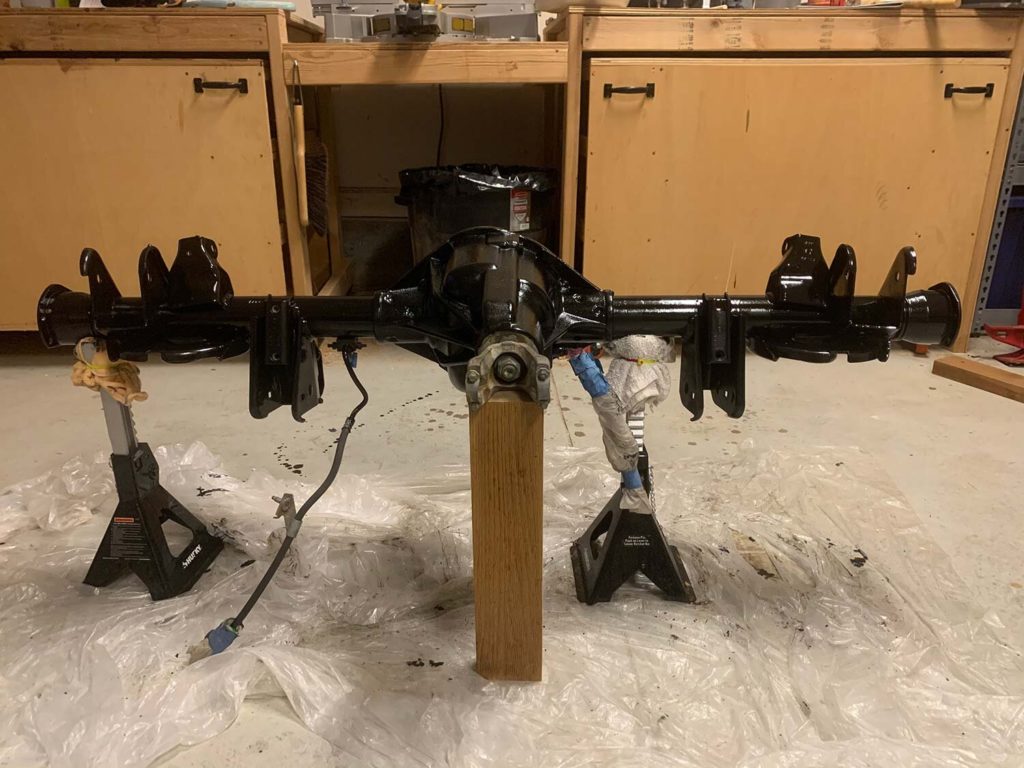
Here is what the axle looked like after applying both coats of POR-15:
The last step is to apply the POR-15 Top Coat. The Top Coat protects the POR-15 from break down that can occur from the sun’s UV rays.
- Apply 2 light coats of the POR-15 Top Coat in the same way that you do with the POR-15 coating
- I also used a new brush for each of the Top Coat layers
- Let each coat dry overnight
And here is the finished product, ready to install!

2 Comments
David Grant
October 28, 2020 at 10:01 amQuick tip for drying, & drying with cleaning, is use a blow gun with an air hose to a compressor. You with blow dry things off fast, plus you can get in all the cracks, crevices & bends. Now if you do the same thing, but with sticking the “straw” of some break cleaner or whatnot into the little air hole midway on the blow gun’s chrome tube, typically where the 2 psrts of the tube screw together, then you will clean & dry effective & efficiently. However, i do advise doing a more thorough cleaning 1st, as stated in the post. But even afterwards as a quick prep & dry before finally painting, this will help get off any oils from fingers, hands, etc etc.
This can also be helpful if the part isn’t so dirty to begin with. Also another extremely great degreaser is Purple Power. Wash parts down in this before paint.
Colby
October 29, 2020 at 8:26 amHey David, thanks for the comment!
Very good suggestions. I didn’t happen to have a compressor and blow gun when I did the axle, but have since gotten one and I use it to clean up pretty much anything I do that involves dust, dirt, or particles that can be blown away.
I also used the blowgun recently to clear out the air input fitting that feeds the rear axle locker in my TJ. It was blocked, so I set the PSI up around 100 or so and blew the fitting clear.
When it comes to painting or covering anything it can never hurt to do as much prep as possible to get the best results.